


This page covers Eventer’s Premium features. The basic features are explained in this tutorial.
Starting the Live Show
The Live Show is a tool that displays all the content of your album on a screen. To set it up:
- Turn the computer on and plug it into the mains
- Connect the computer to the Internet
- Check the settings and disable every sleep option
- Find the “Live Show” HTML link previously sent by email by the Eventer team and click it to open it in a recent browser, preferably Chrome
- You can also get this link from the app at any time: open the “Live Show” panel and tap “SEND LIVE SHOW” to share it
- Connect the computer to the screen dedicated to the Live Show with an HDMI cable (bring a USB-C adapter if your computer has no HDMI port)
- For the best display, extend your screen and make sure your resolution is set to 100%
- Don’t forget to put the live show in full screen
You can set up the Live Show in two ways: by clicking on the screen — a configuration panel appears in the top left — or from the app’s “Live Show Config” panel, which controls the Live Show remotely. The settings below are shown from the app.
Scrolling speed
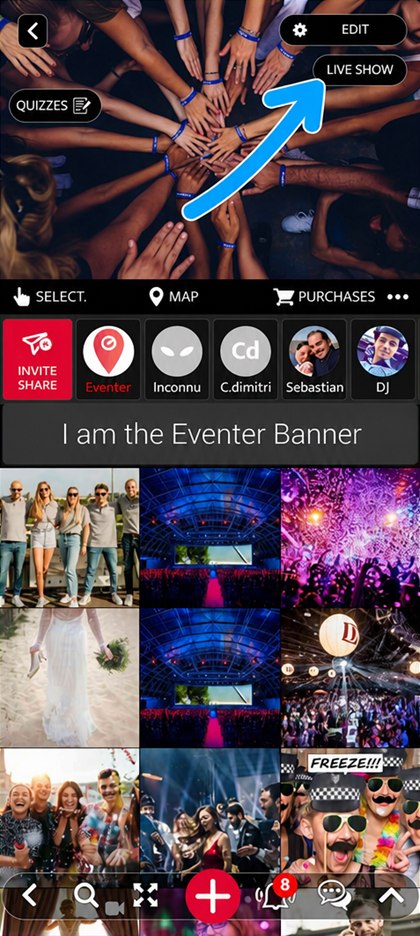
Click “LIVE SHOW”
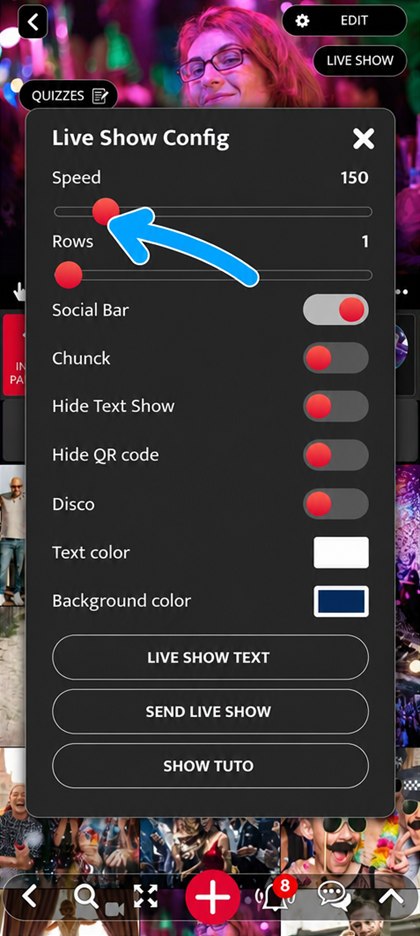
Lower or raise the “Speed” slider
Number of content rows
Click “LIVE SHOW”
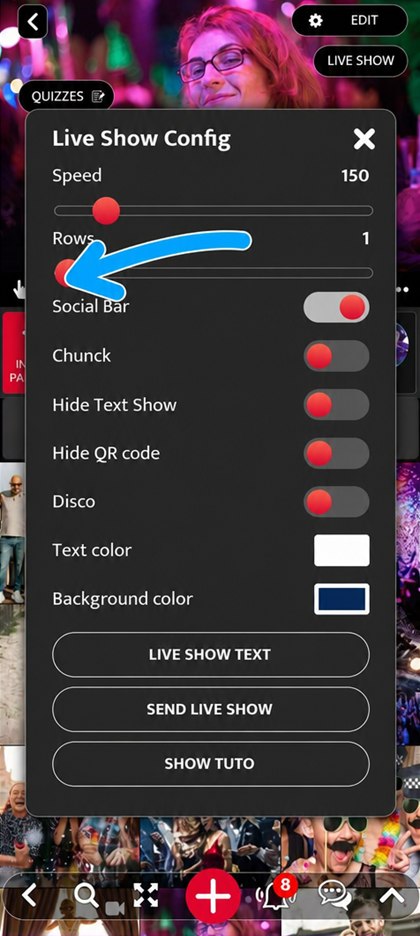
Choose the number of content rows with the “Rows” slider
« Social Bar »
Show the comments and likes of the content during the Live Show, along with the person who posted it.
Click “LIVE SHOW”
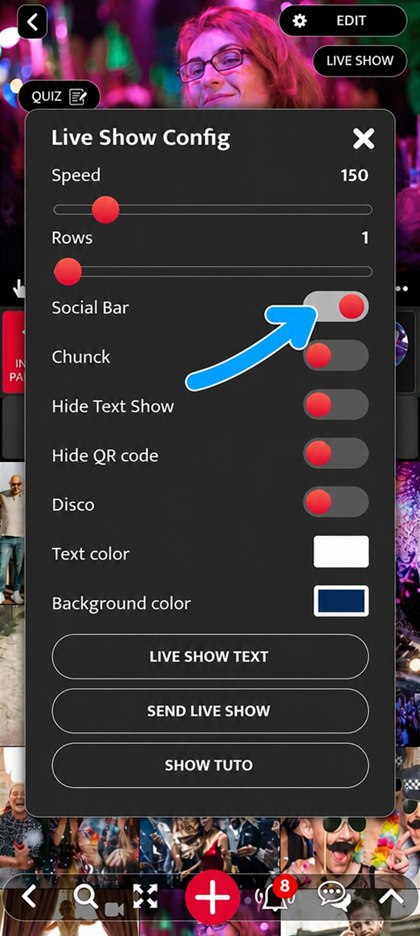
Turn “Social Bar” on or off
“Chunck” mode
“Chunck” mode is a different scrolling mode, in steps.
Click “LIVE SHOW”
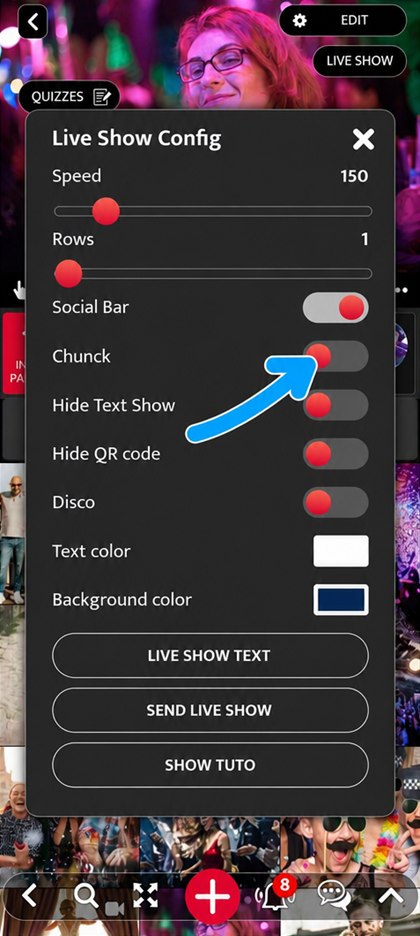
Turn “Chunck” on or off
“Hide Text Show”
Hides the Live Show text on the display screen without deleting it: just turn the setting back on to bring it back.
Click “LIVE SHOW”
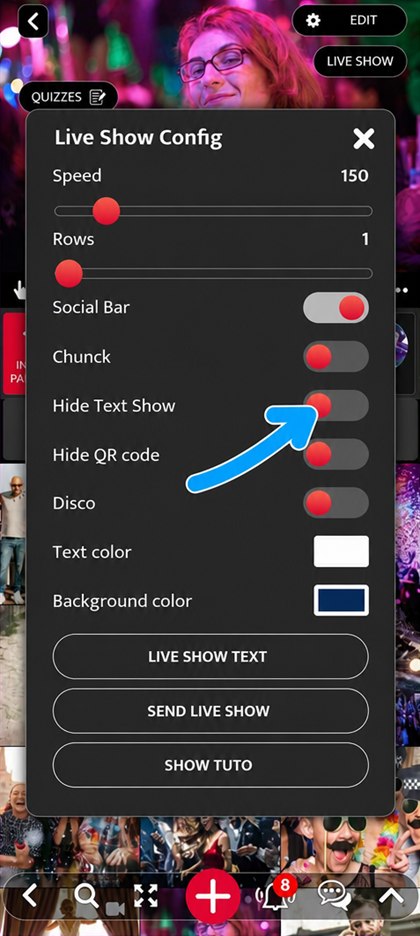
Turn “Hide Text Show” on or off
“Hide QR code”
The Live Show displays a QR code that lets guests join the event from the screen. This setting removes it from the display.
Click “LIVE SHOW”
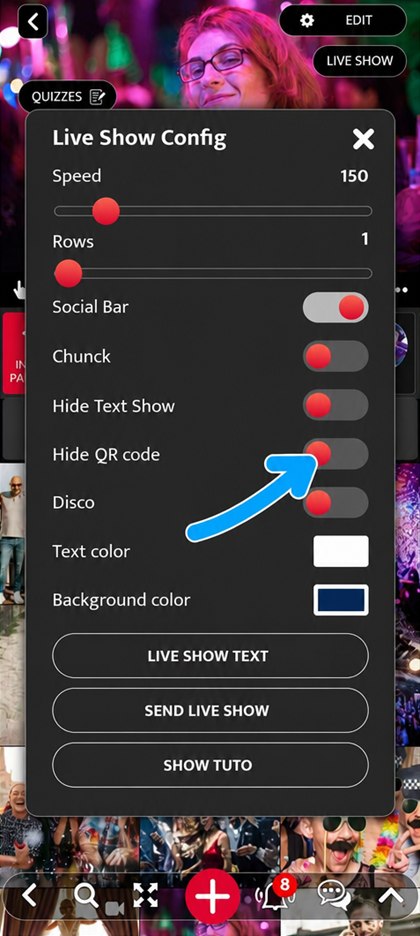
Turn “Hide QR code” on or off
“Disco”
A livelier display, for party moods.
Click “LIVE SHOW”
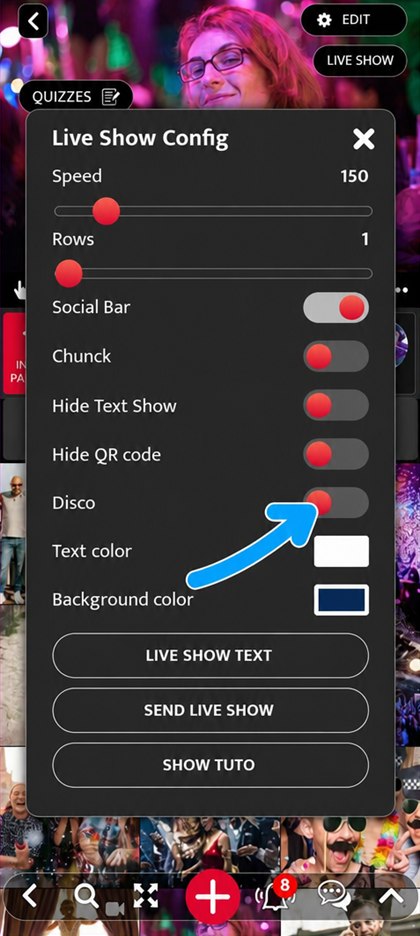
Turn “Disco” on or off
Text colour
Click “LIVE SHOW”
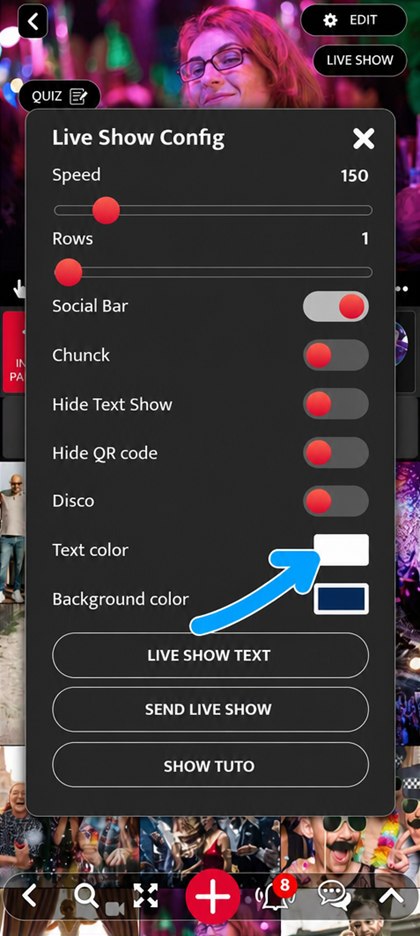
Click the “Text color” swatch
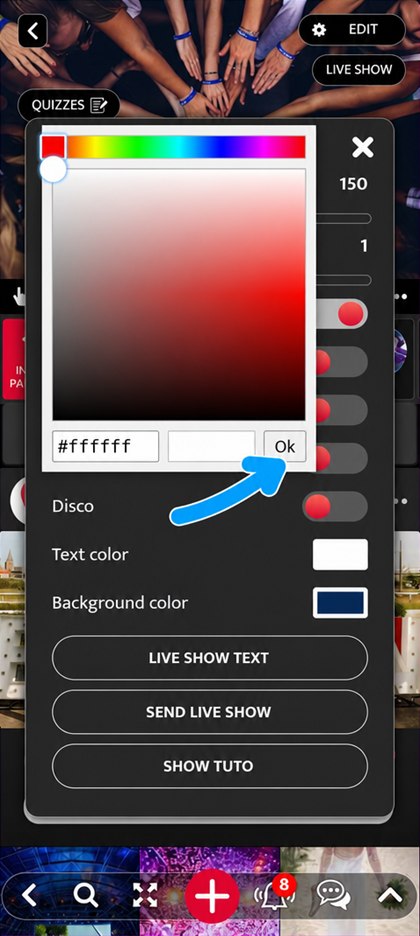
Pick the colour and confirm with “OK”
Background colour
Click “LIVE SHOW”
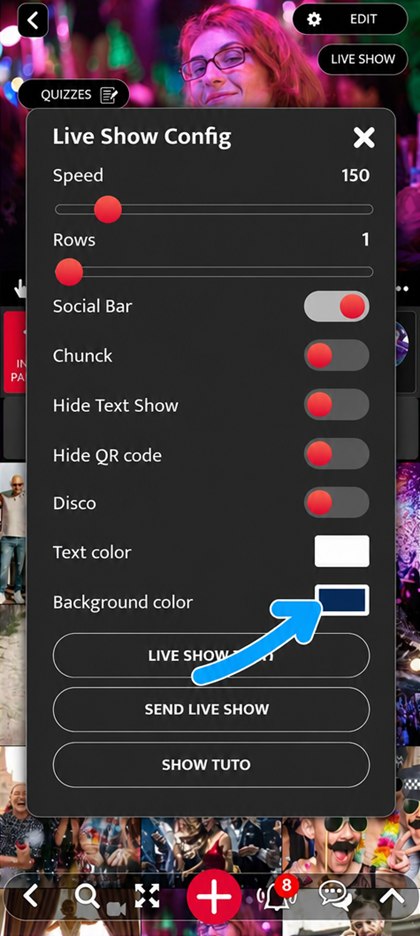
Click the “Background color” swatch
Pick the colour and confirm with “OK”
Live Show text
Click “LIVE SHOW”
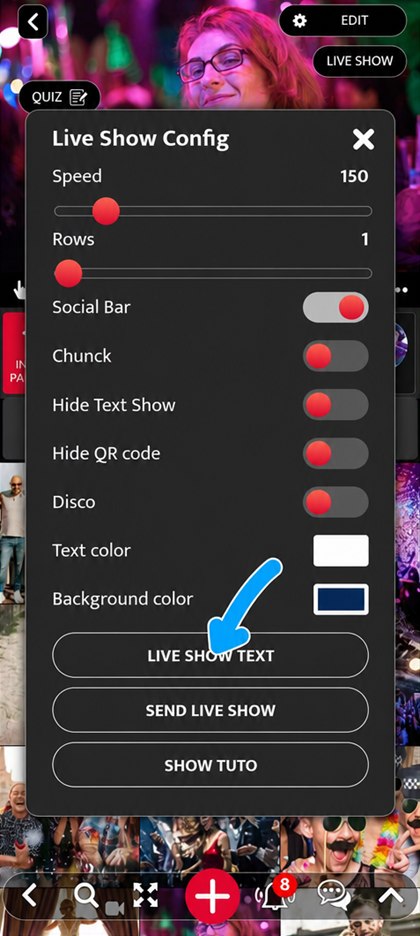
Click “LIVE SHOW TEXT”
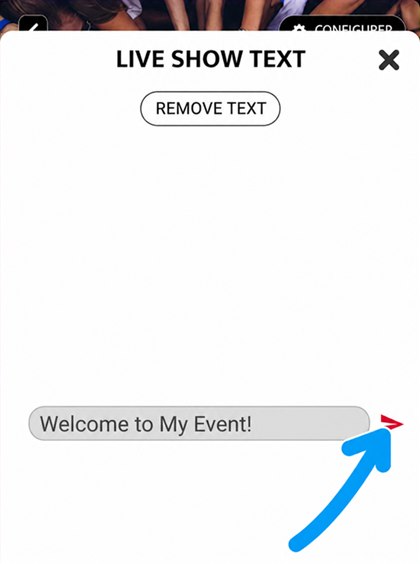
Type the text, then confirm with the arrow. To remove it, click “REMOVE TEXT”
How often an item is shown
Each item can appear on screen more or less often, or be left out of the Live Show.
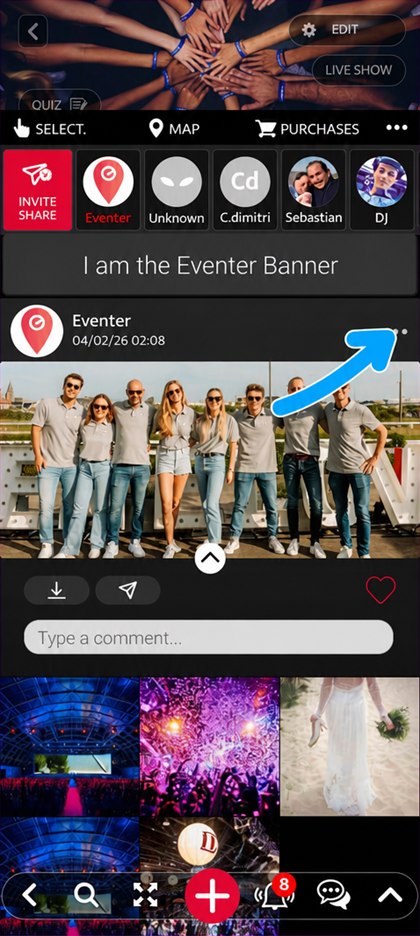
Click an item, then on “…” at the top right
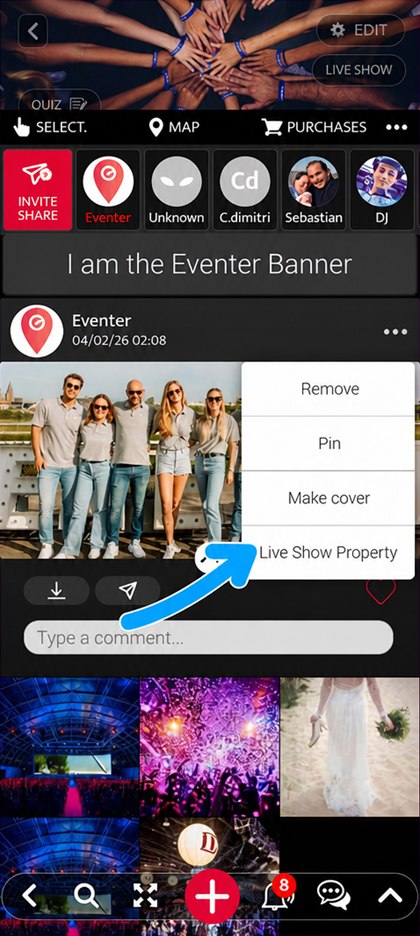
Click “Live Show Property”
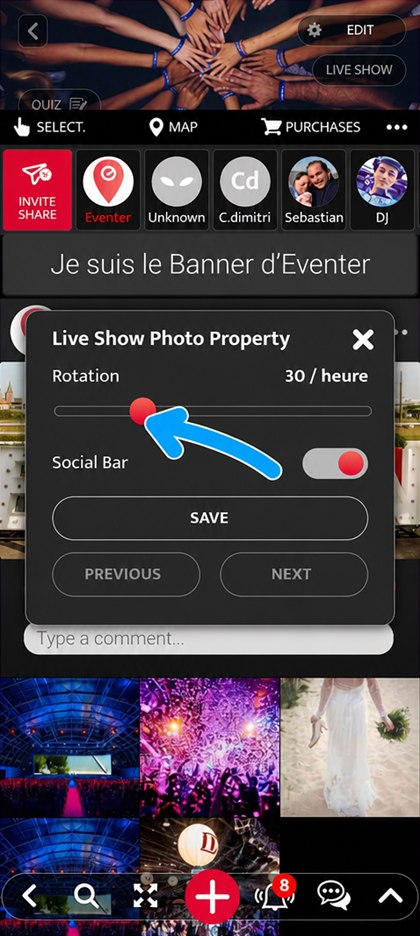
Set “Rotation”: “NEVER” to leave the item out, “Normal” to keep it in the rotation, or from 1 to 120 appearances per hour
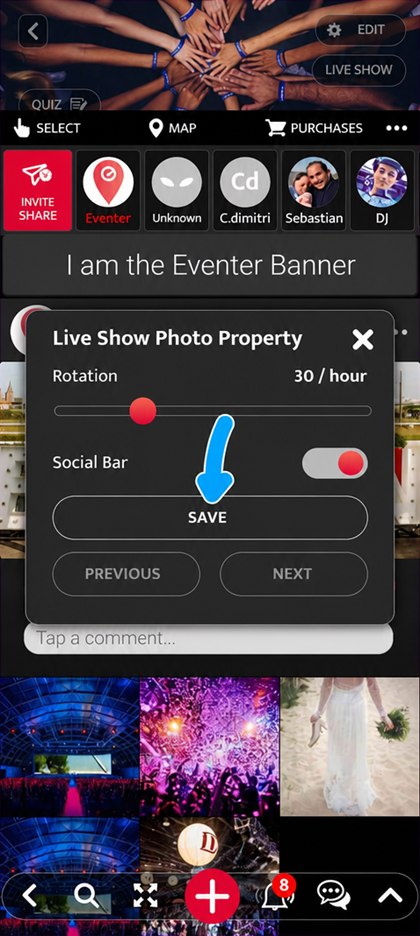
Click “SAVE”: without this step the setting is not stored
“Still Video” mode
“Still Video” mode holds the Live Show on a video so that it can be watched in full.
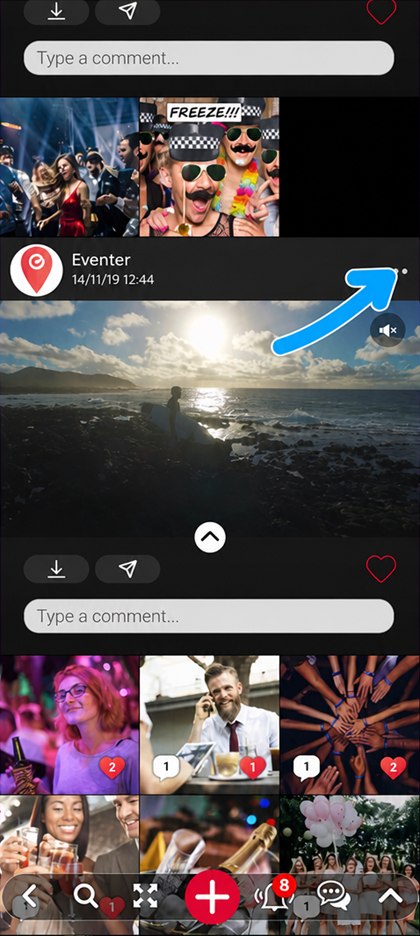
Click the video, then on “…” at the top right
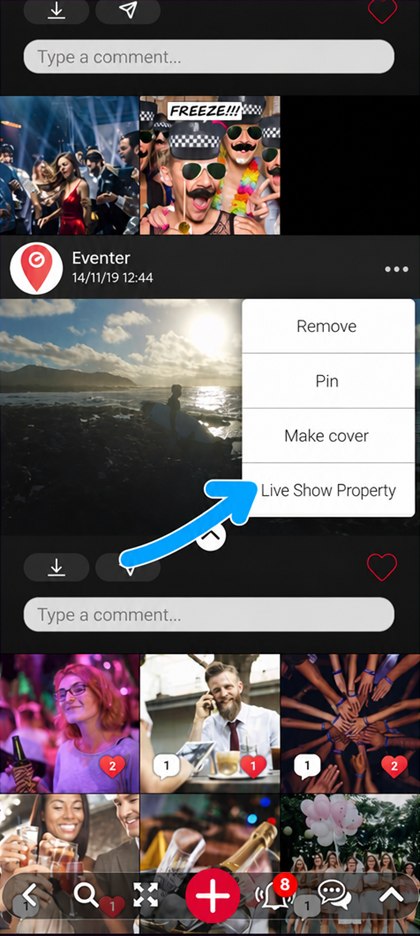
Click “Live Show Property”
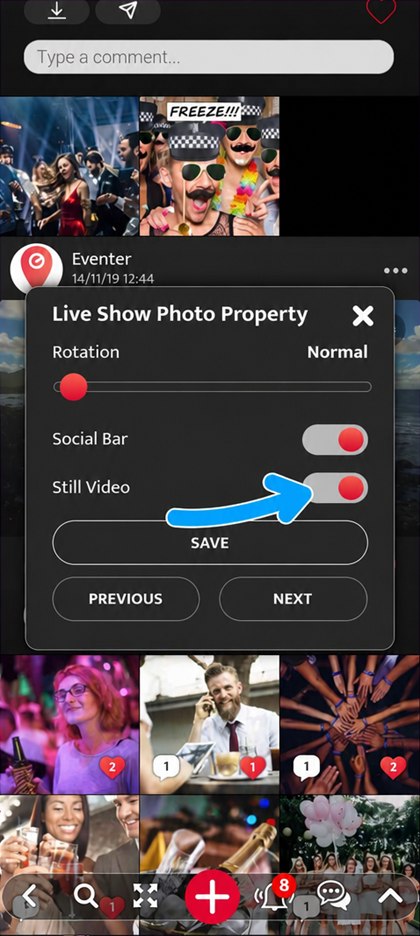
Turn “Still Video” on
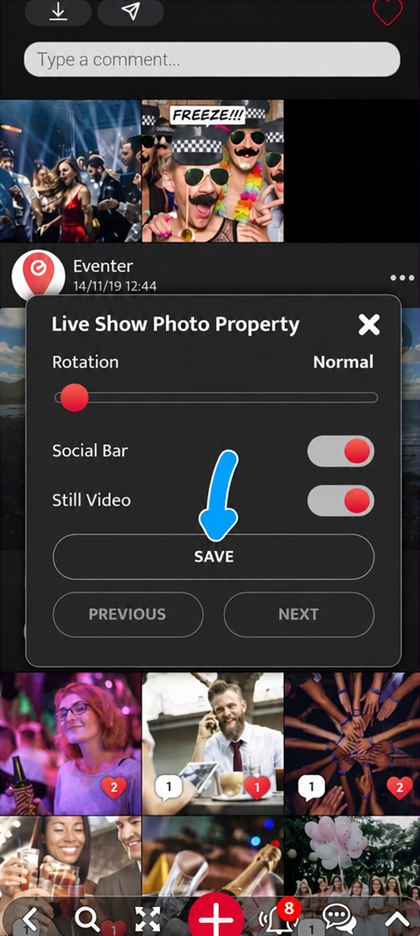
Click “SAVE”: without this step the setting is not stored
Personalise Eventer’s camera and photobooth by creating your own filter (text, filter type, colours, …).
Smartphone
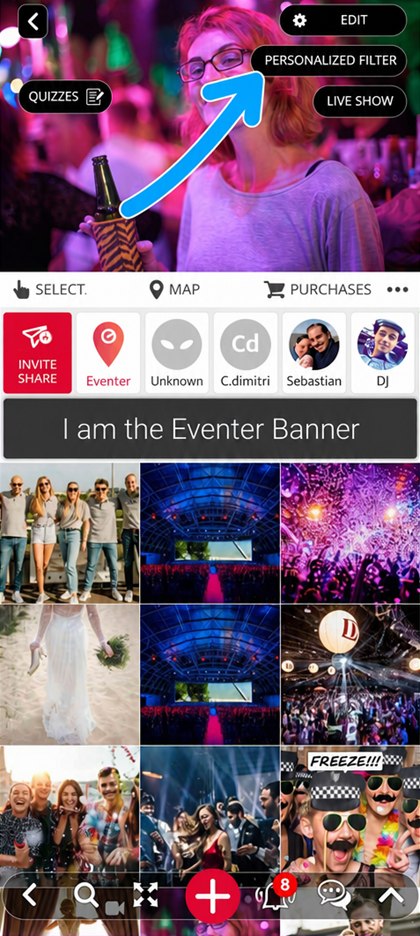
To create or edit your filter, use the “PERSONALIZED FILTER” button at the top right of the event
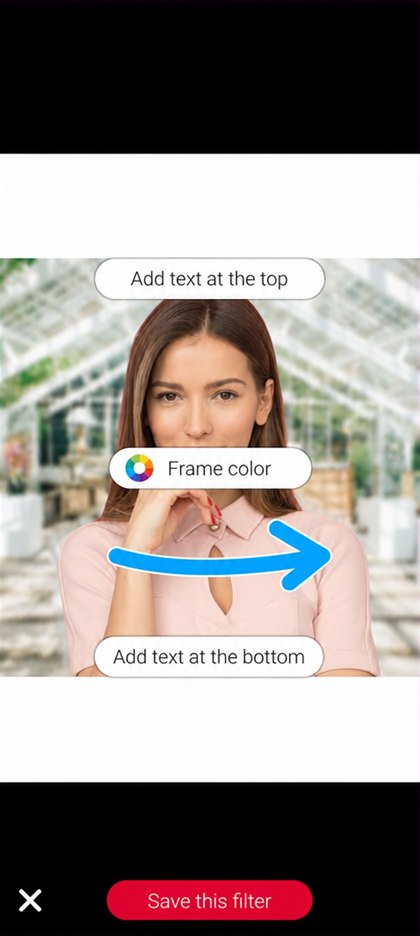
Choose the frame by swiping your finger horizontally
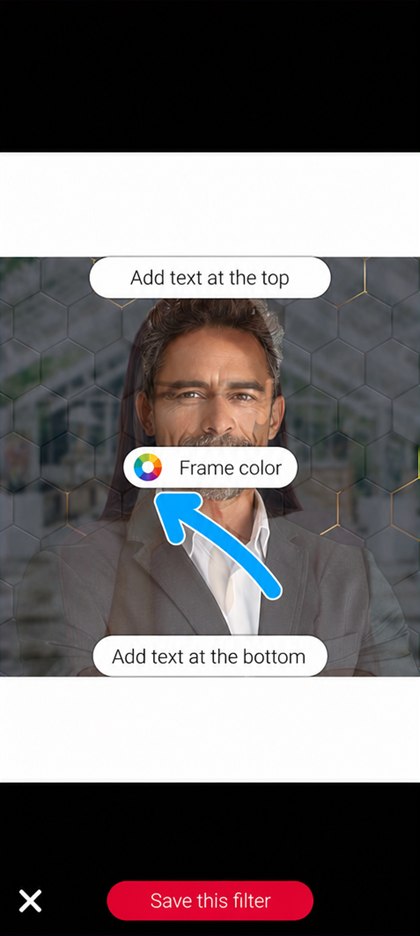
Click “Frame color” to change the colour of the frame
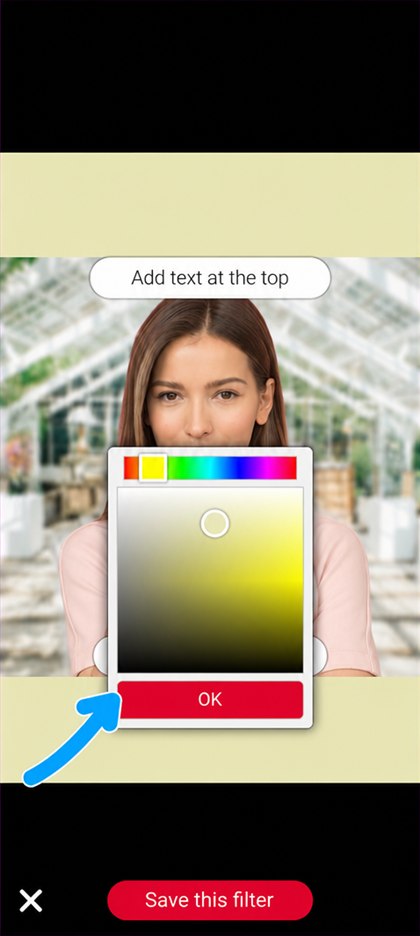
Adjust the colour and click “OK”
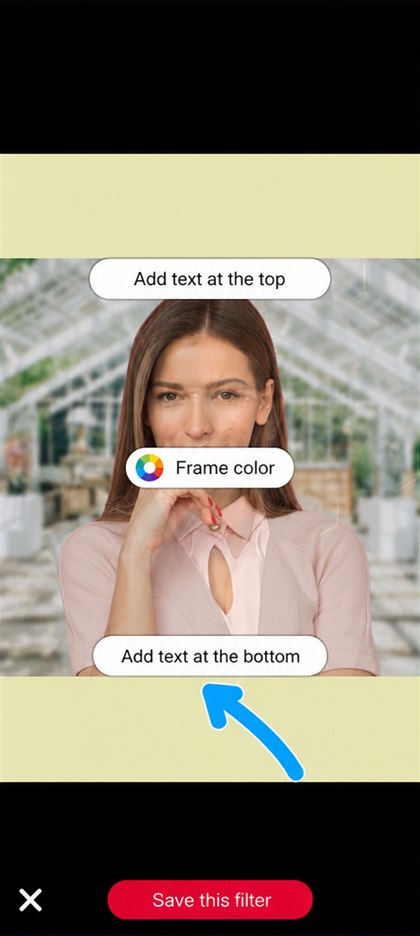
Click “Add text at the bottom”
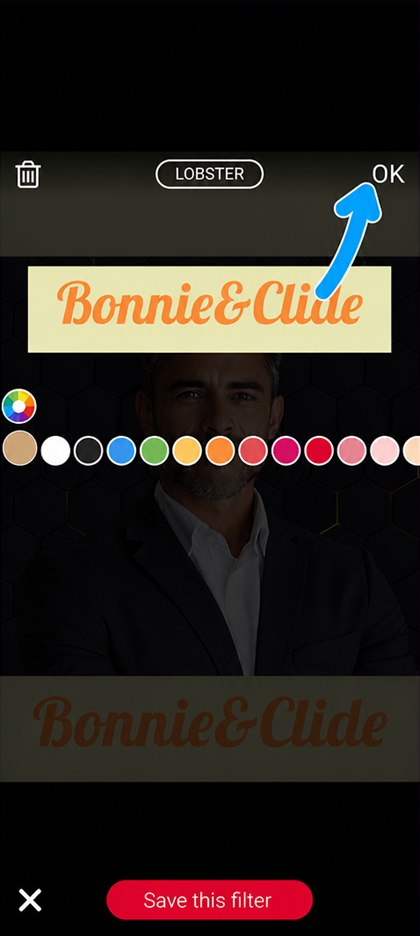
Type the text (keep it short), choose the typeface and the colour, then click “OK”
If you wish, you can also add text at the top, with the “Add text at the top” button.
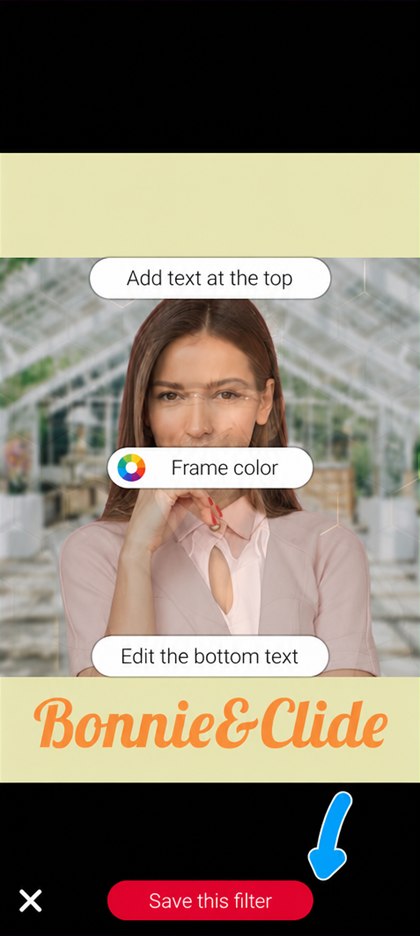
Click “Save this filter” when you are done
Computer
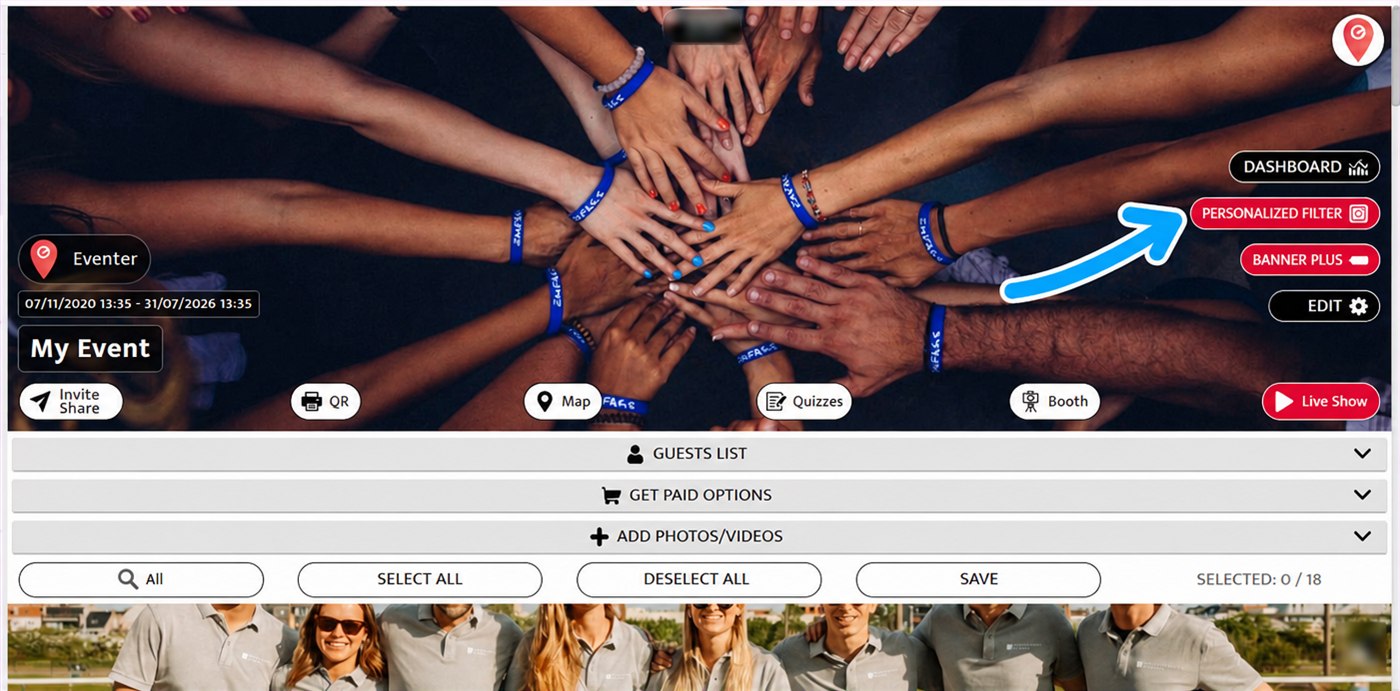
Click “PERSONALIZED FILTER”, at the top right of your event
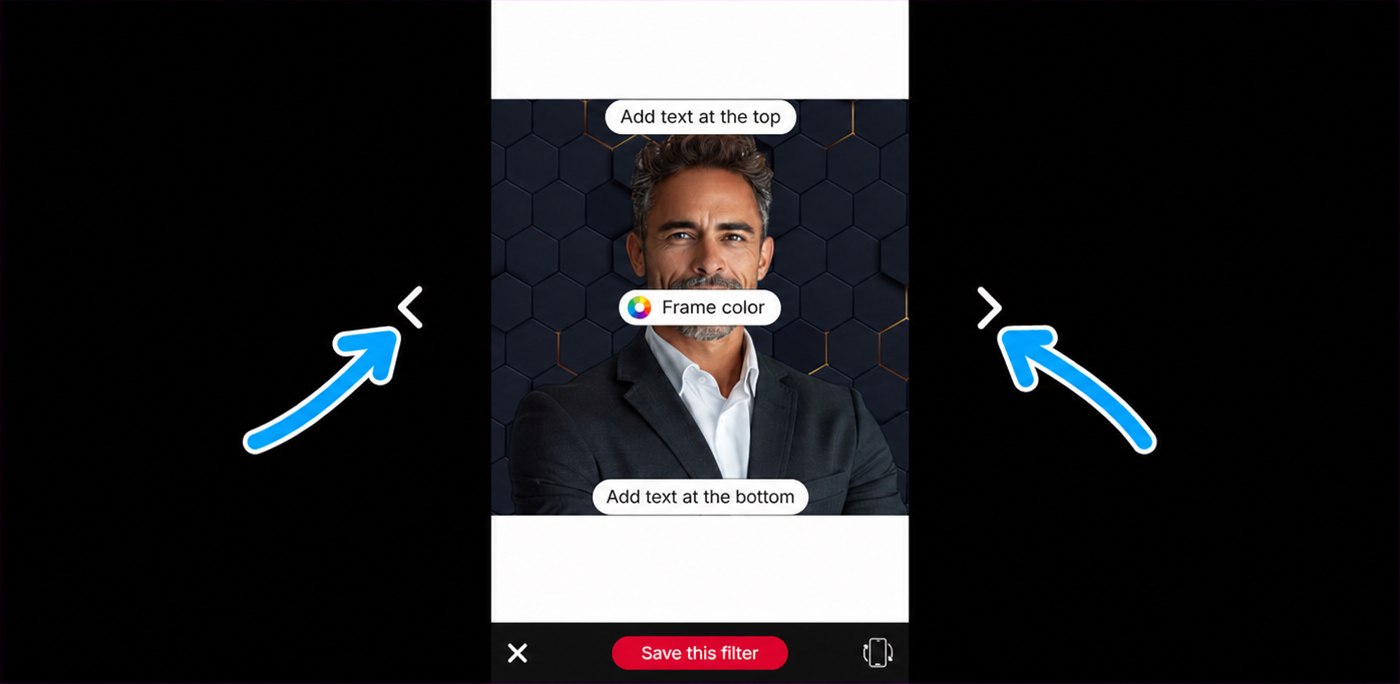
Choose the frame with the arrows on the left and right
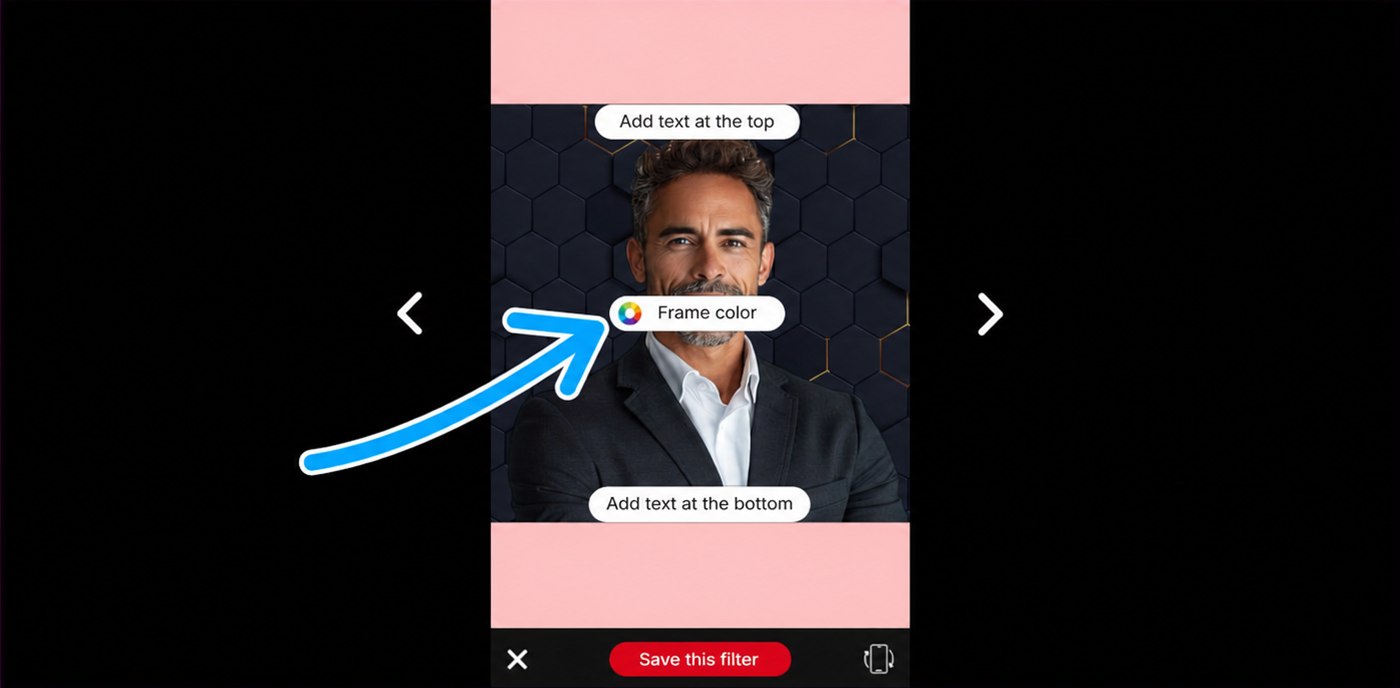
Click “Frame color” to change the colour of the frame
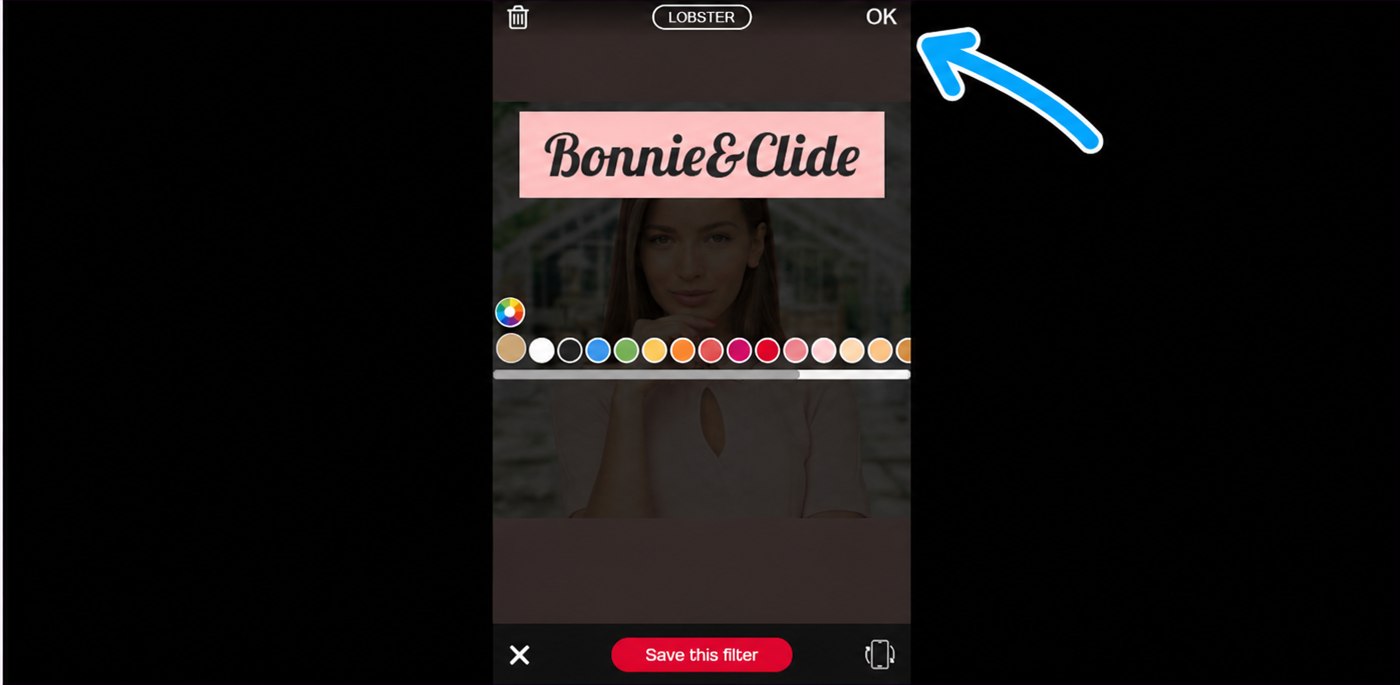
Type the text (keep it short), choose the typeface and the colour, then click “OK”
If you wish, you can also add text at the top, with the “Add text at the top” button.
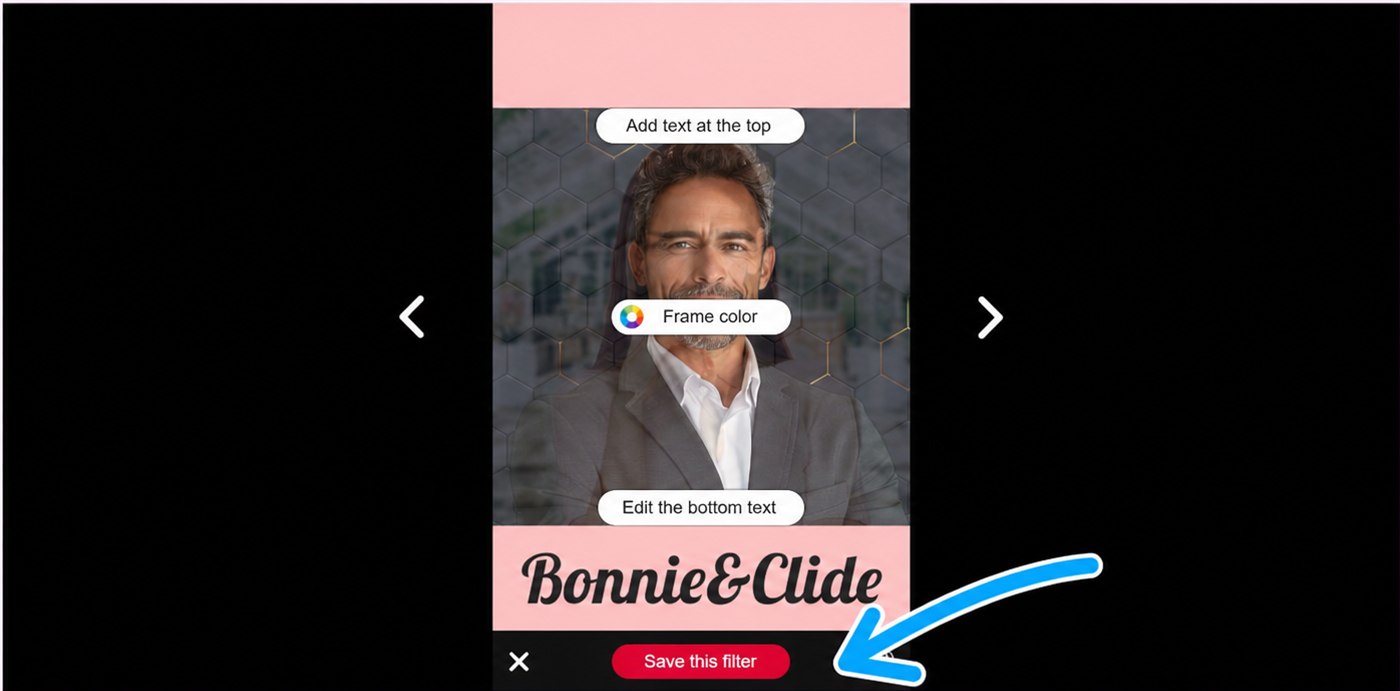
Click “Save this filter” when you are done
Once saved, the filter is available in the Eventer camera (including your guests’) and in the event’s photobooth.
Personalise Eventer’s camera and photobooth for your guests by creating and uploading your own filters.
If you have no graphic design skills, you can create your filters in two minutes with an AI.
This option is set up from a computer. Open the event:
- Log in to your account if needed
- Select your event on the left, in the list of events
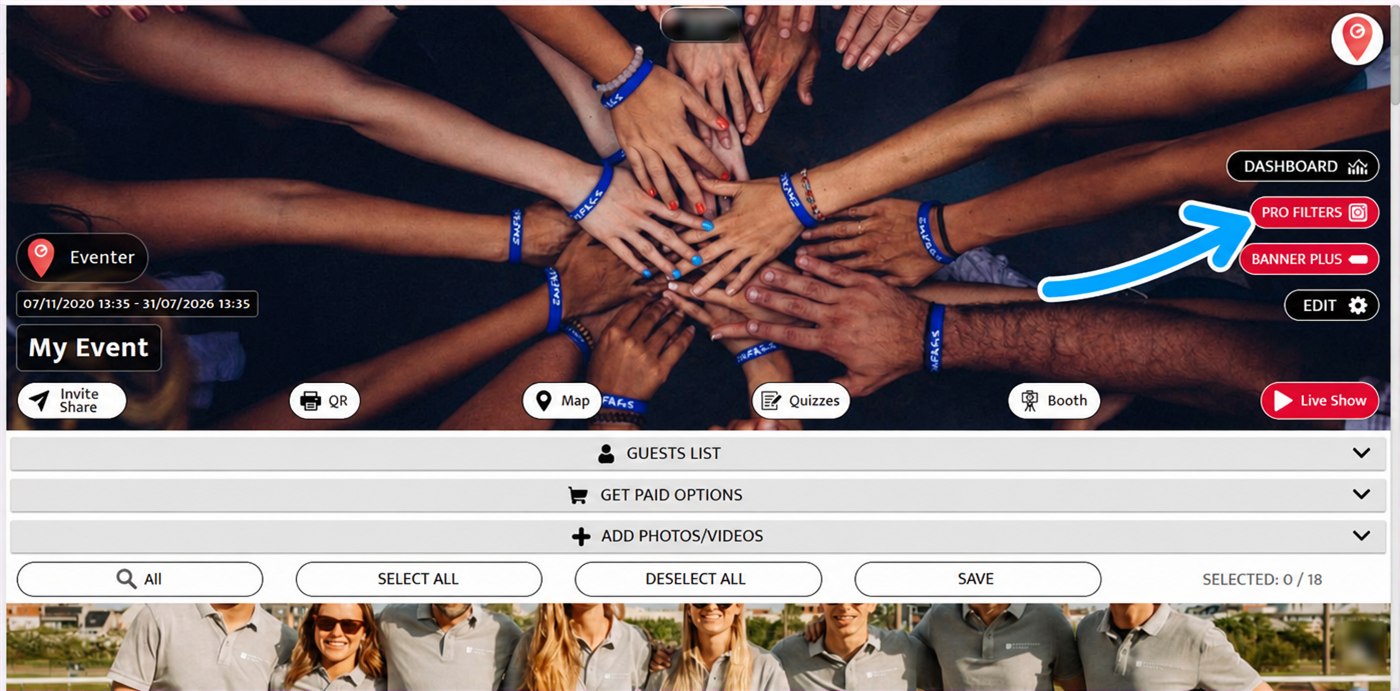
Click the “PRO FILTERS” button, at the top right of the event
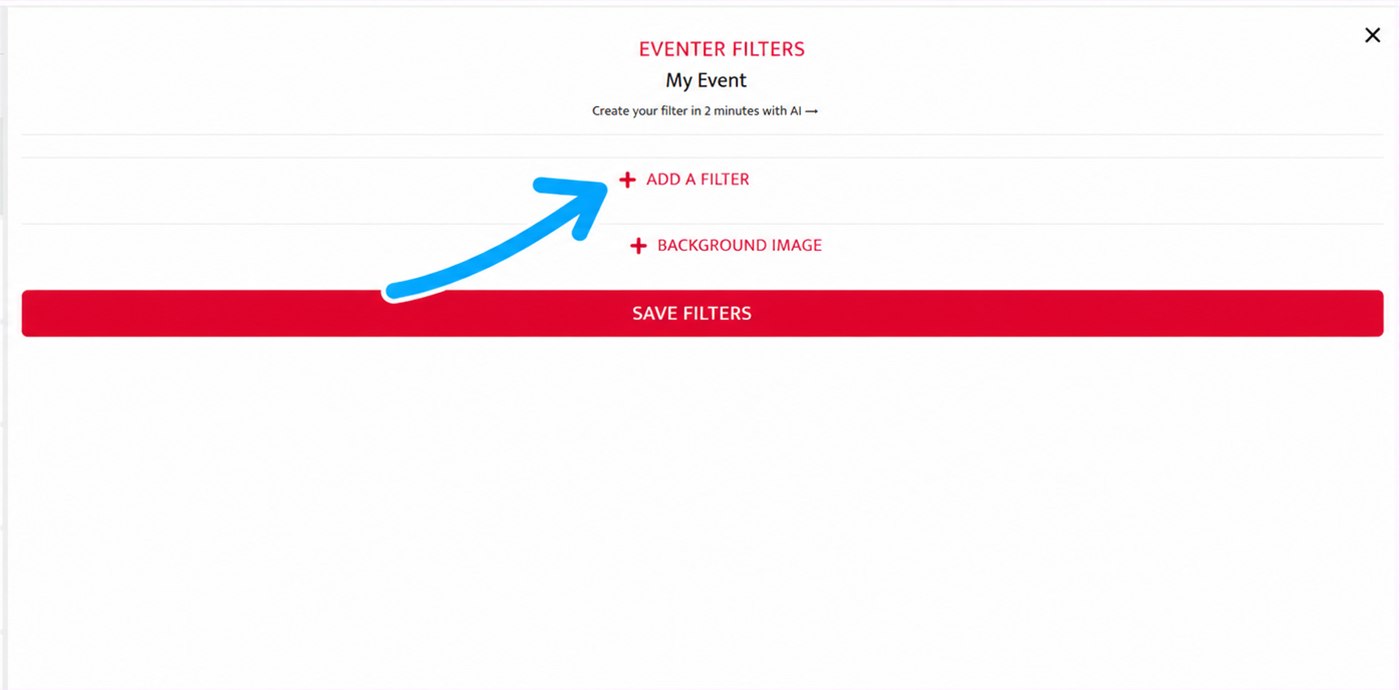
Click “+ ADD A FILTER”
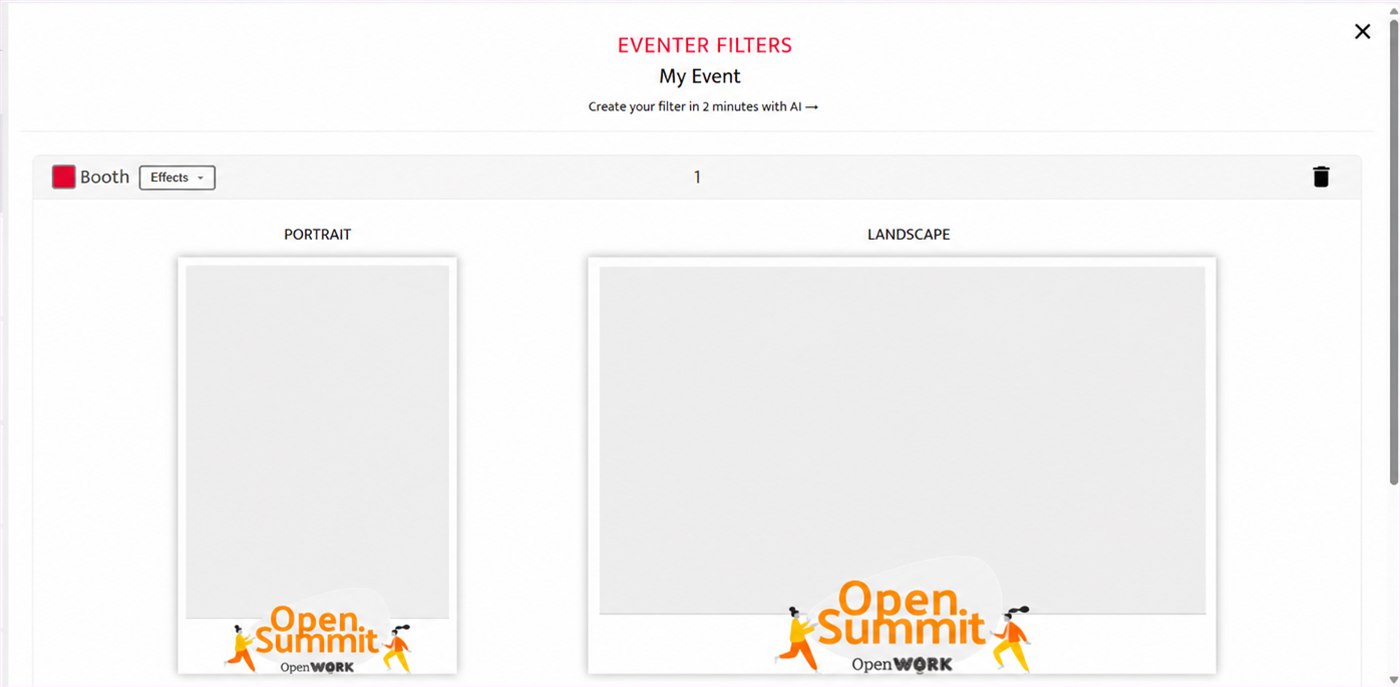
Drop the portrait and landscape filters
Technical specifications
- Portrait filter: PNG 1080 × 1620 px
- Landscape filter: PNG 1620 × 1080 px
- Transparent background required: only the artwork — logo, frame, text, illustrations — should be visible
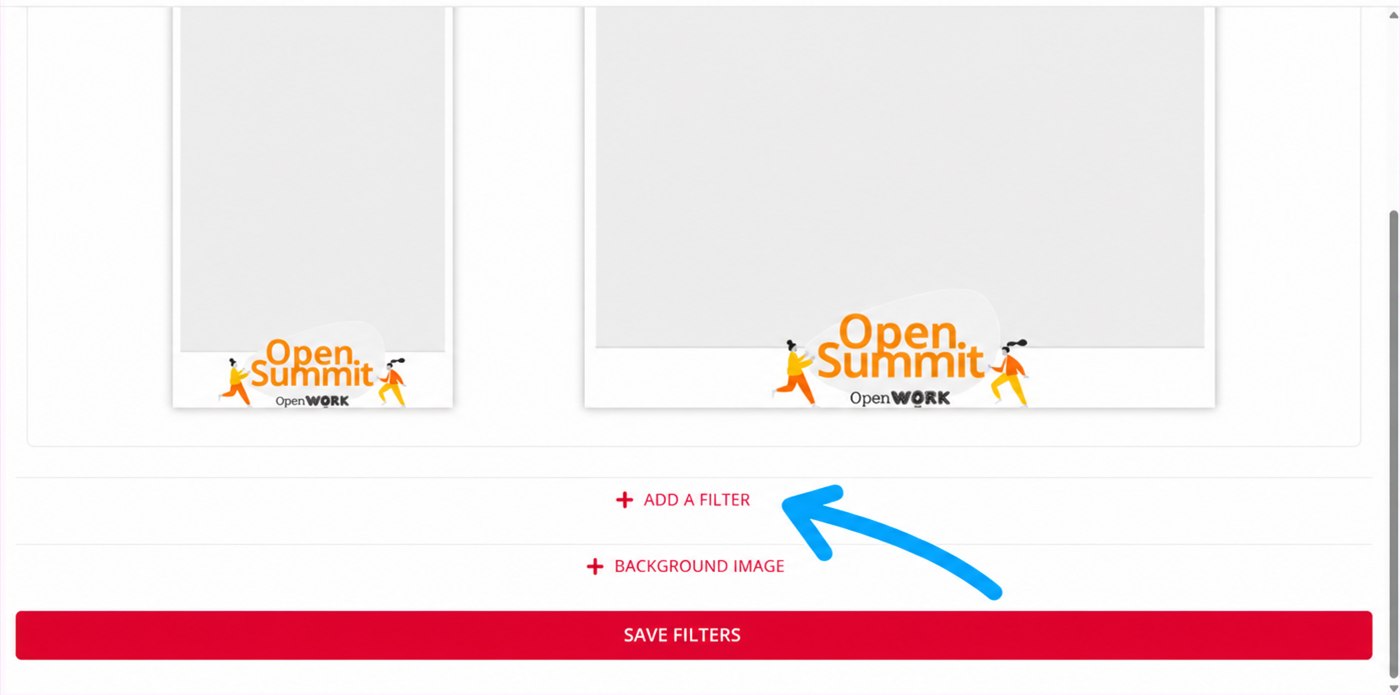
Click “+ ADD A FILTER” again to add more. You can also delete a filter or change their order
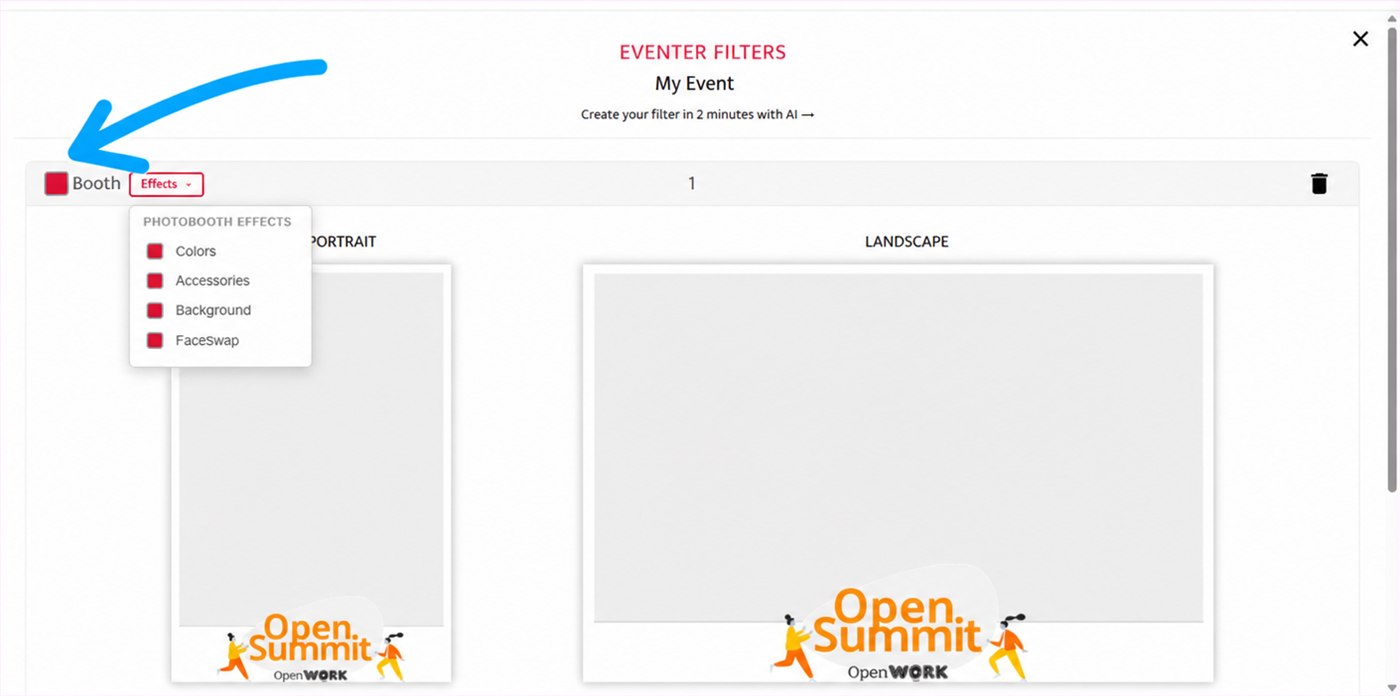
The checkbox at the top left of each filter shows which filter is in use, and which effects are enabled for the photobooth
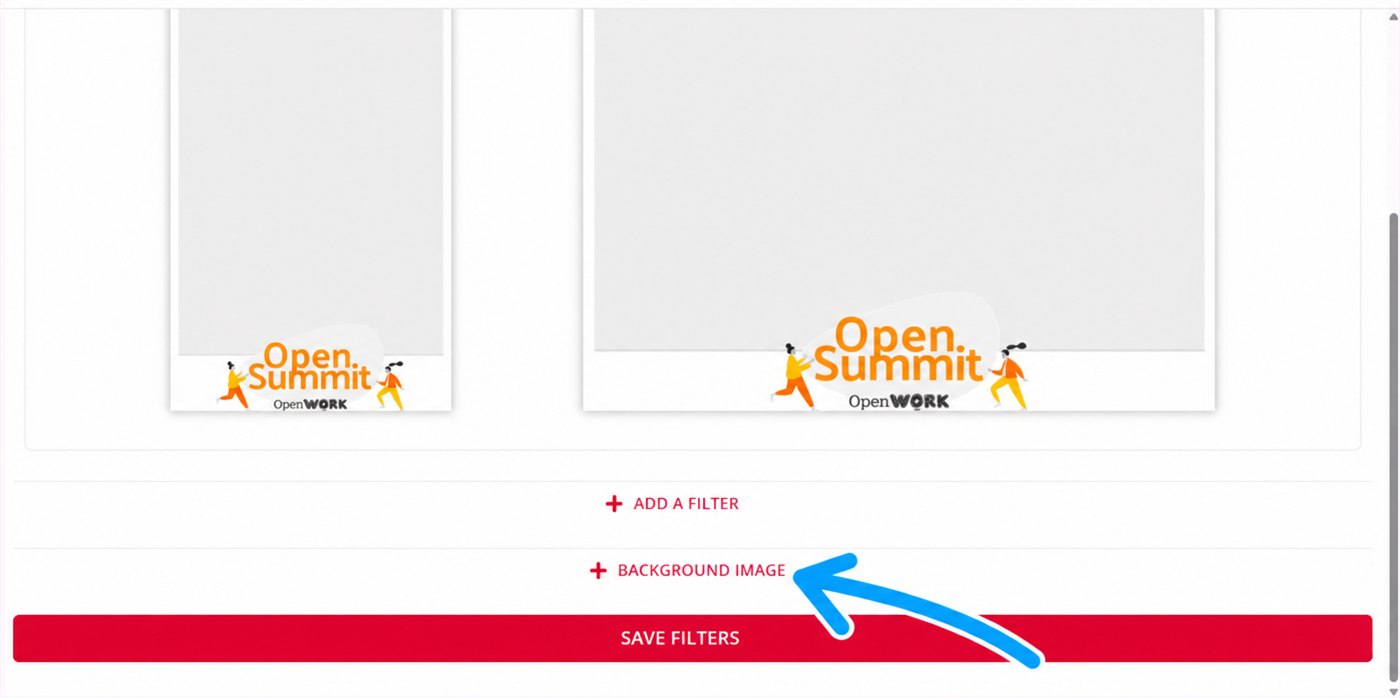
To add a custom background to the camera and the photobooth, click “+ BACKGROUND IMAGE”
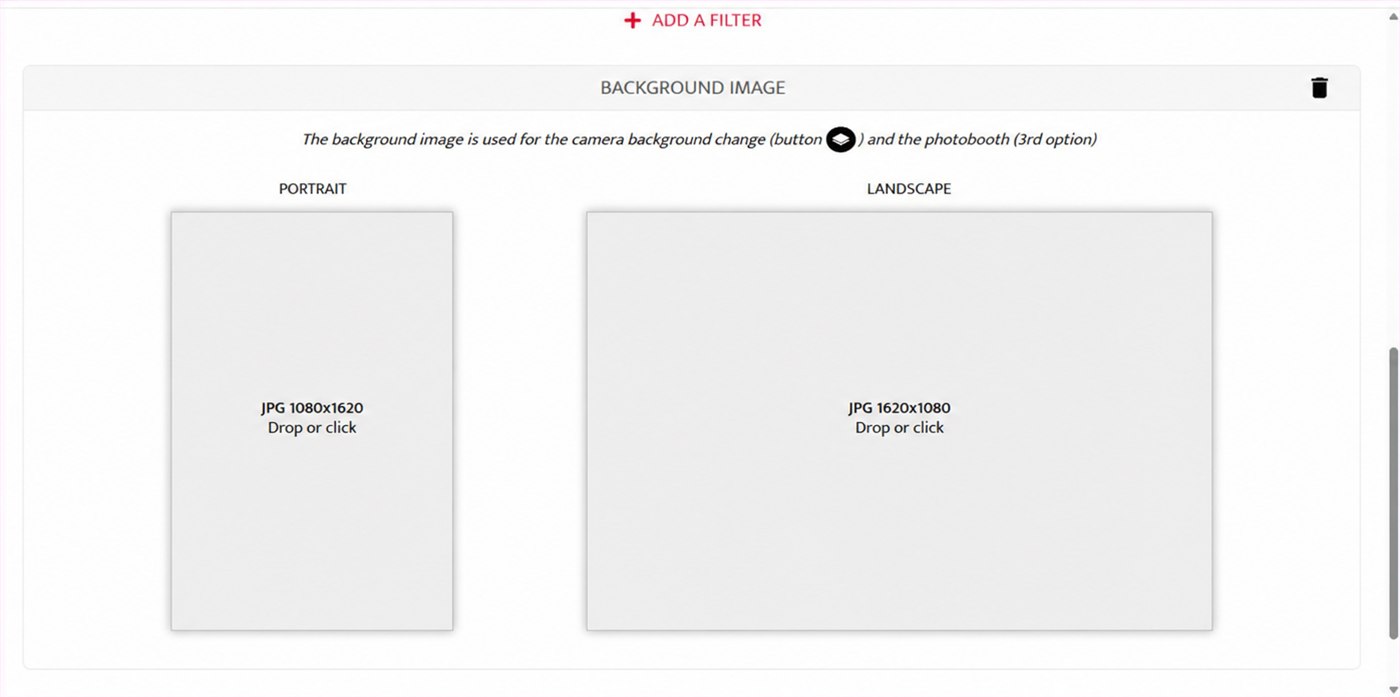
Drop the background images in JPG format, at 1080 × 1620 and 1620 × 1080
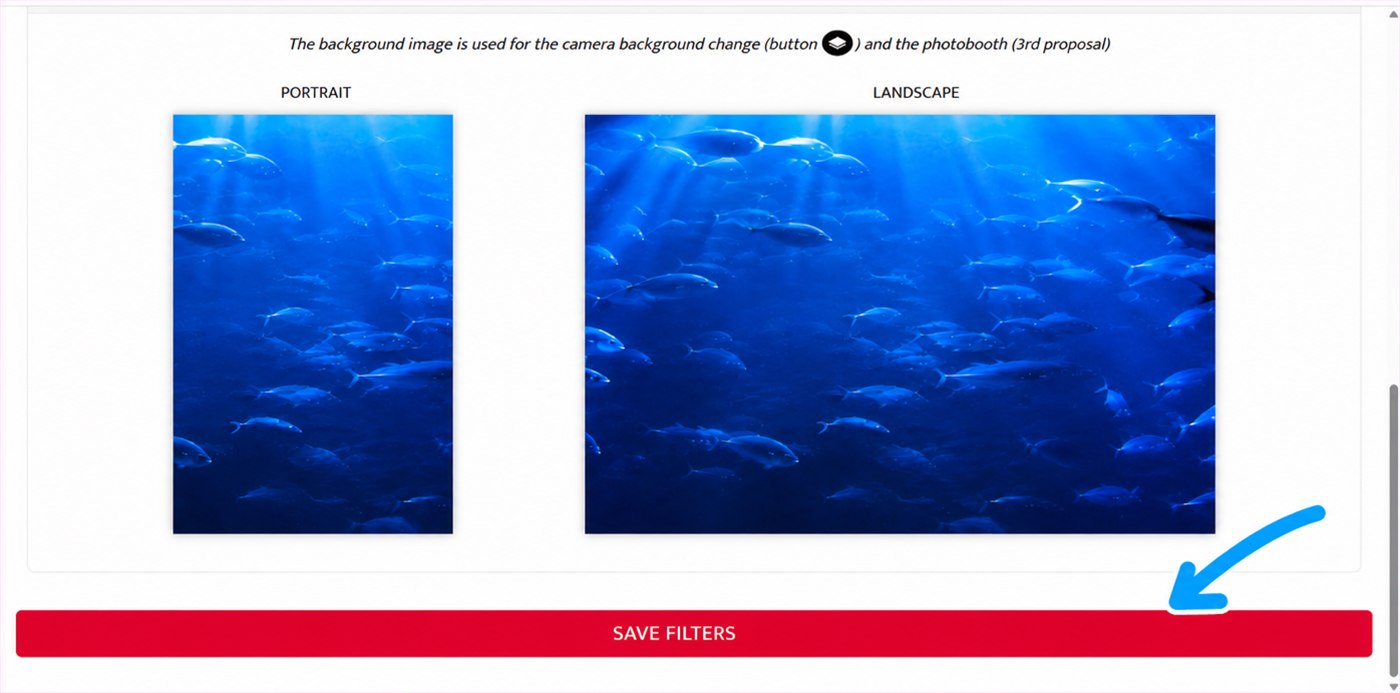
Click “SAVE FILTERS” when you are done
Once saved, the filters are available in the Eventer camera (including your guests’) and in the event’s photobooth.
The Premium licence lets you appoint additional administrators. They have the same rights as the event creator (delete, exclude, Live Show features, …), except for configuring the event and appointing administrators.
To grant or revoke administrator access for a guest, go to their public profile and click the three dots at the top left.
Smartphone
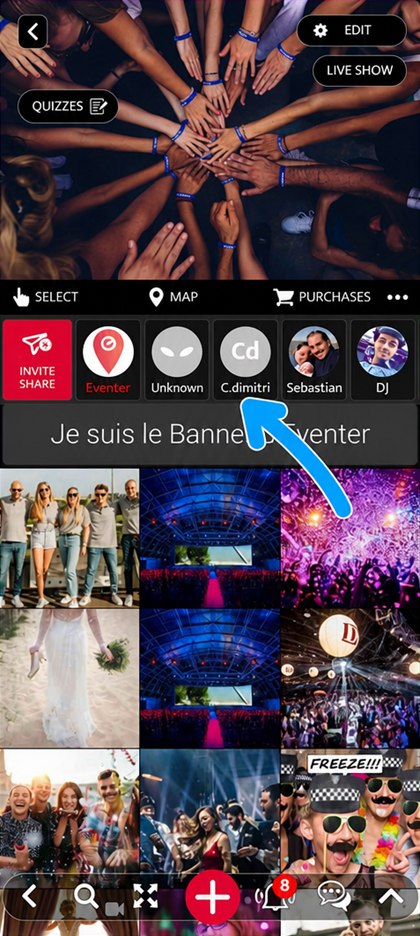
Click the guest in the guests list
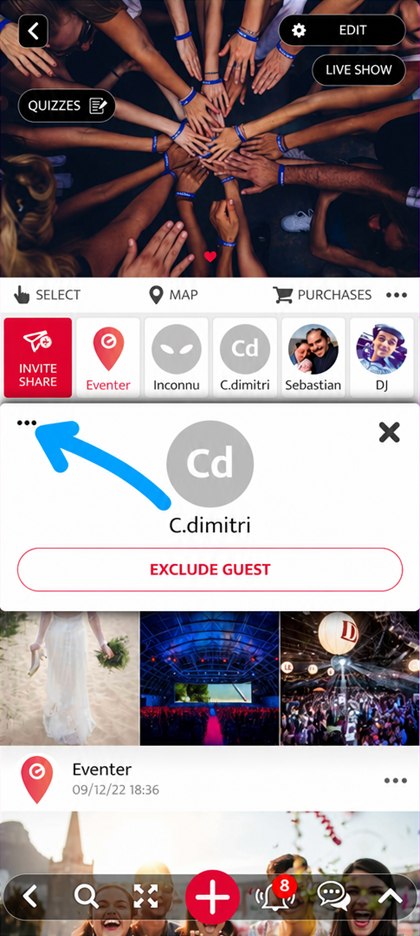
Click the three dots at the top left
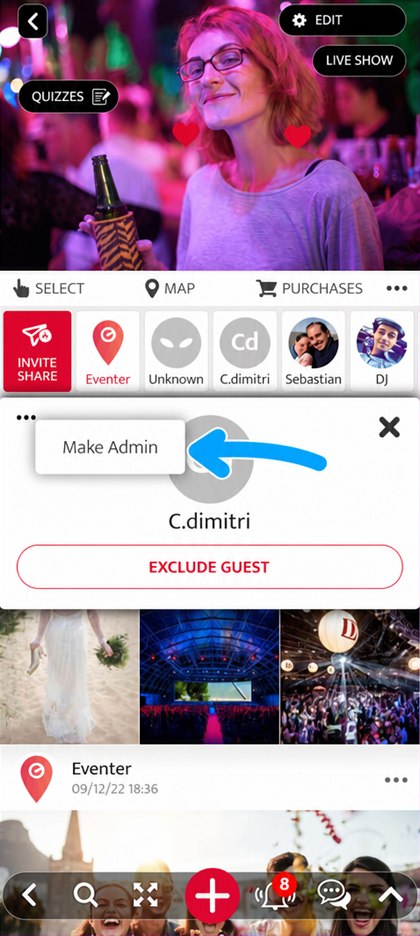
Click “Make Admin”. The same menu then lets you revoke the access
Computer
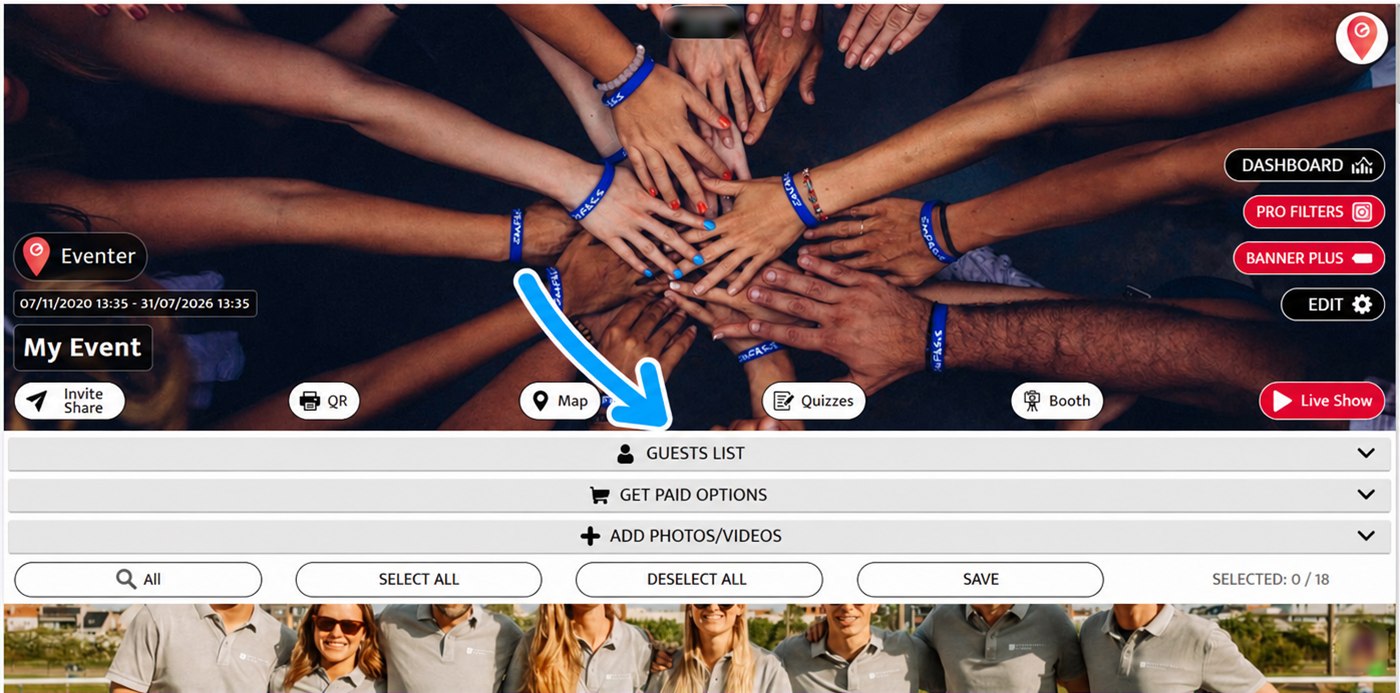
Open “GUESTS LIST”
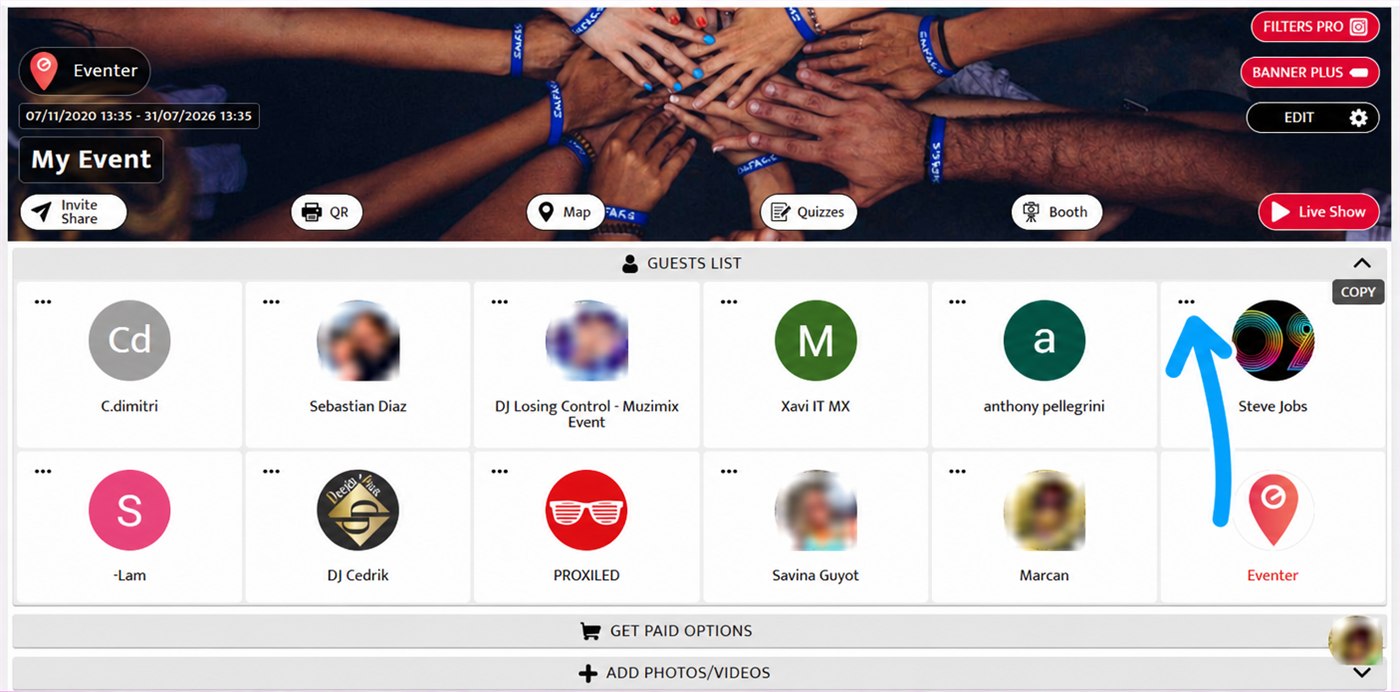
Click the three dots of the guest
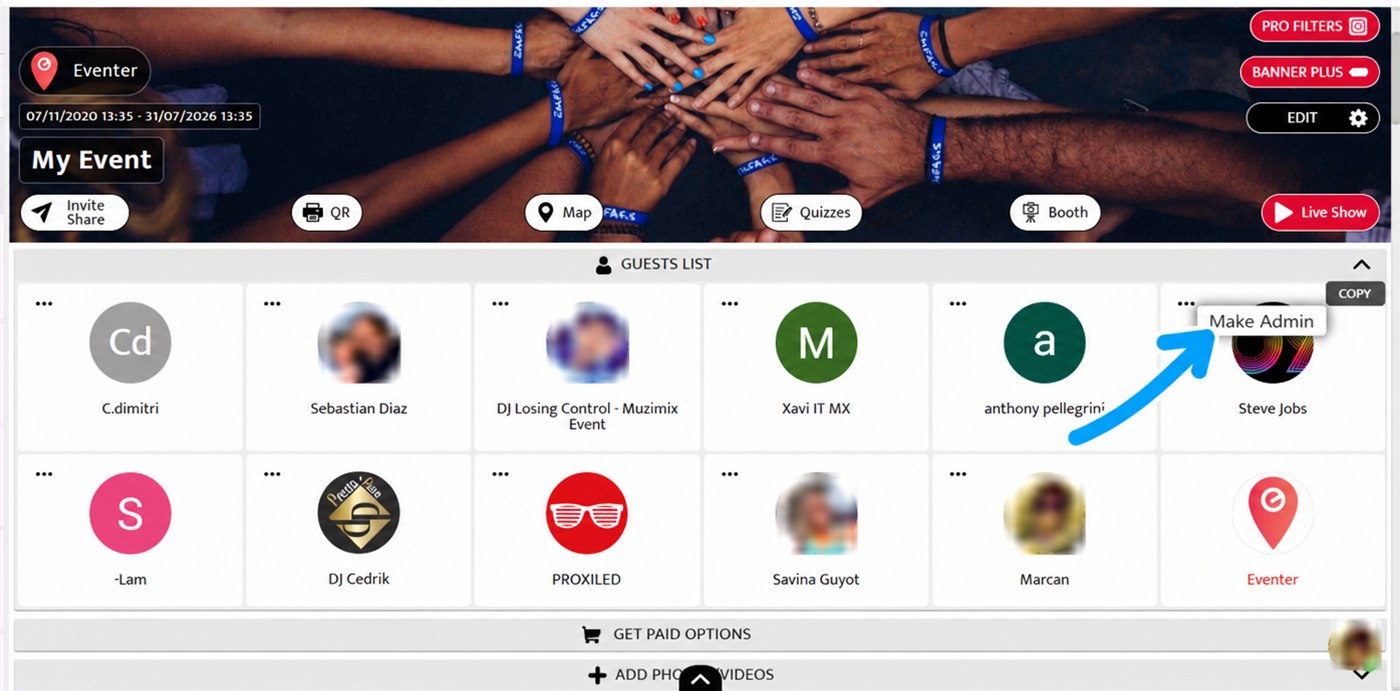
Click “Make Admin”. The same menu then lets you revoke the access
The Banner is the strip shown at the top of your event (on smartphone only). The Banner Plus option lets you personalise its appearance and its actions: you can, for instance, announce the day’s programme, run a contest, or link to a travel diary.
The settings screen is the same on smartphone and on computer, and has three blocks:
- TEXT — the message shown in the banner, which you can set in bold, italic or underlined.
- APPEARANCE — the text colour and the background colour, with a preview of the banner that updates with every change.
- ACTION — what happens when a guest clicks the banner: No action, Camera to open the camera, PDF, Picture, or Web page. This last one asks for the address to open and lets you choose between displaying it inside Eventer and opening the browser.
The “SEND” button only appears once you change something: it is what applies the changes, without which nothing is saved.
Smartphone
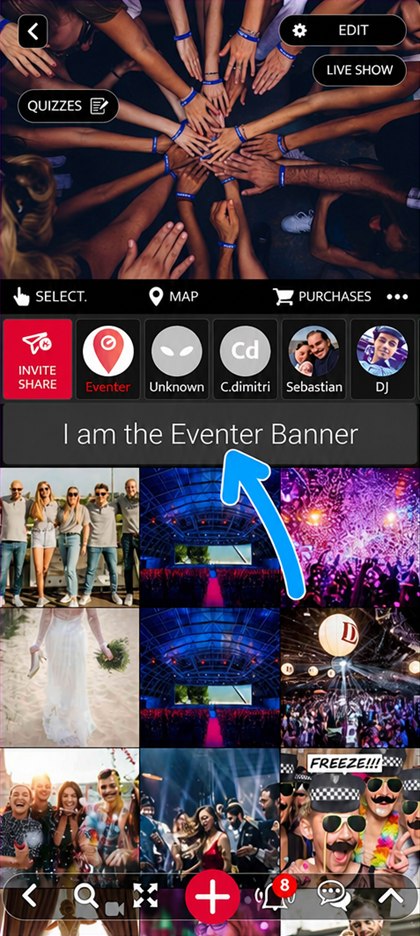
Click the banner, at the top of your event
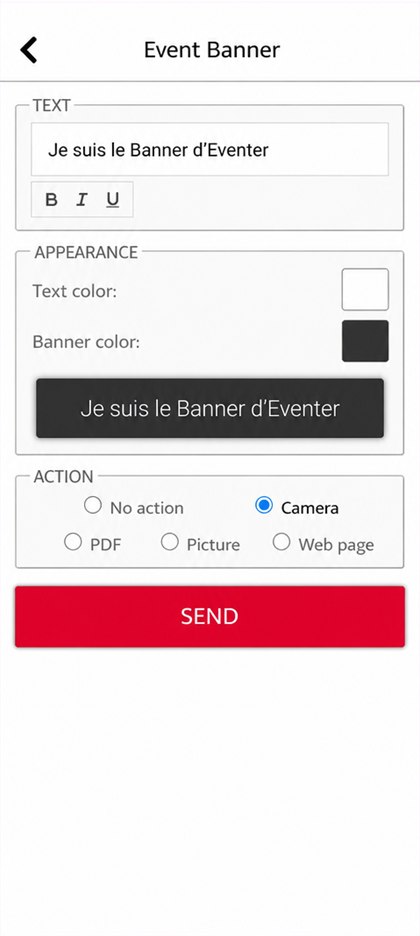
Set the text, the colours and the action, then confirm with “SEND”
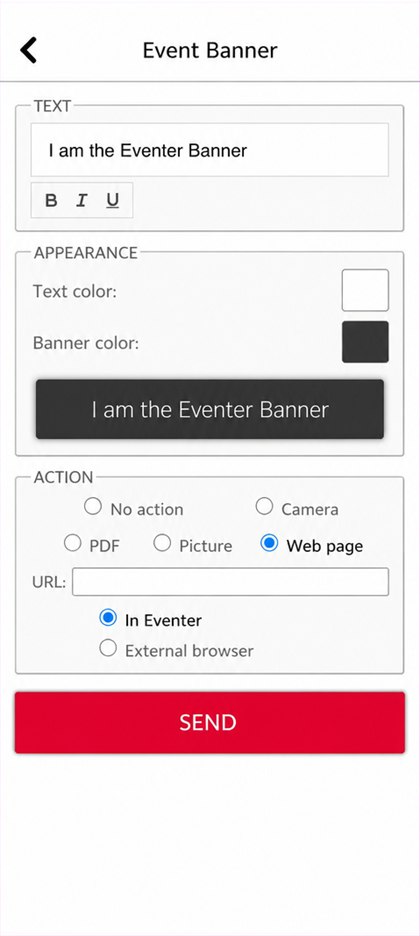
With “Web page”, enter the address and choose whether it opens inside Eventer or in the browser
Computer
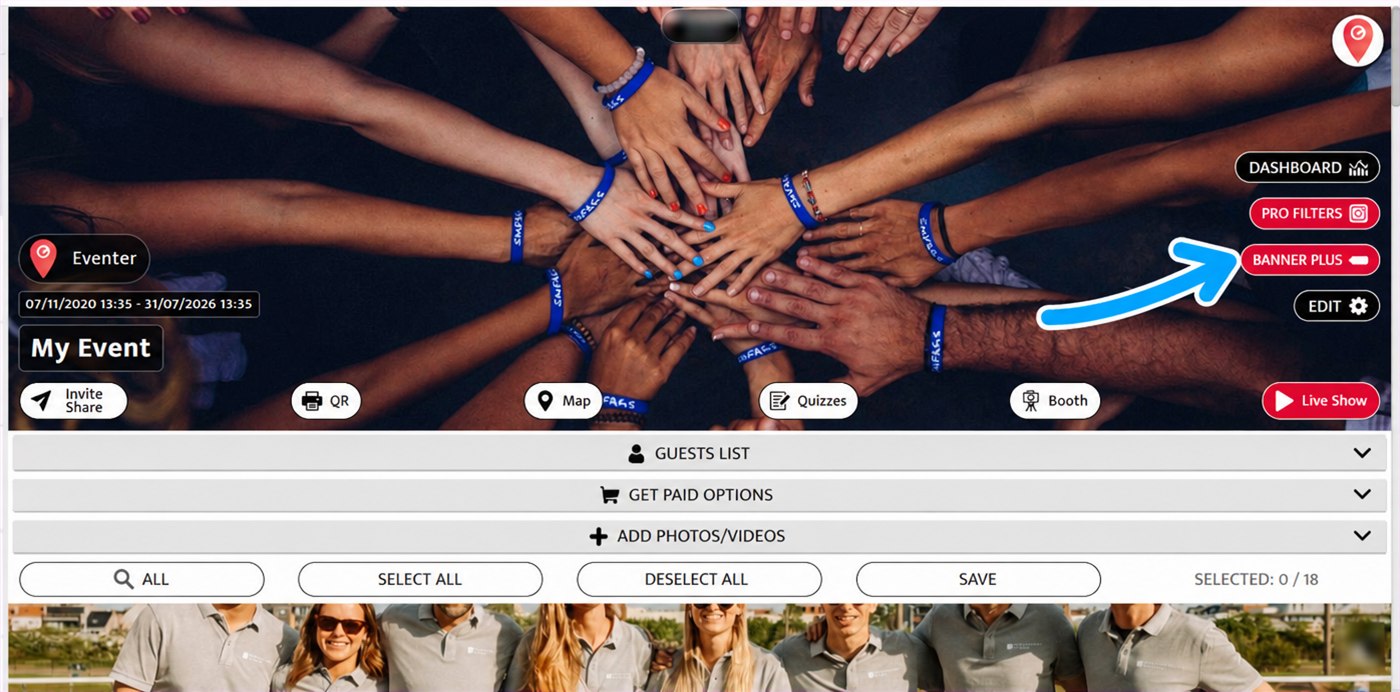
Click “BANNER PLUS”, at the top right of your event
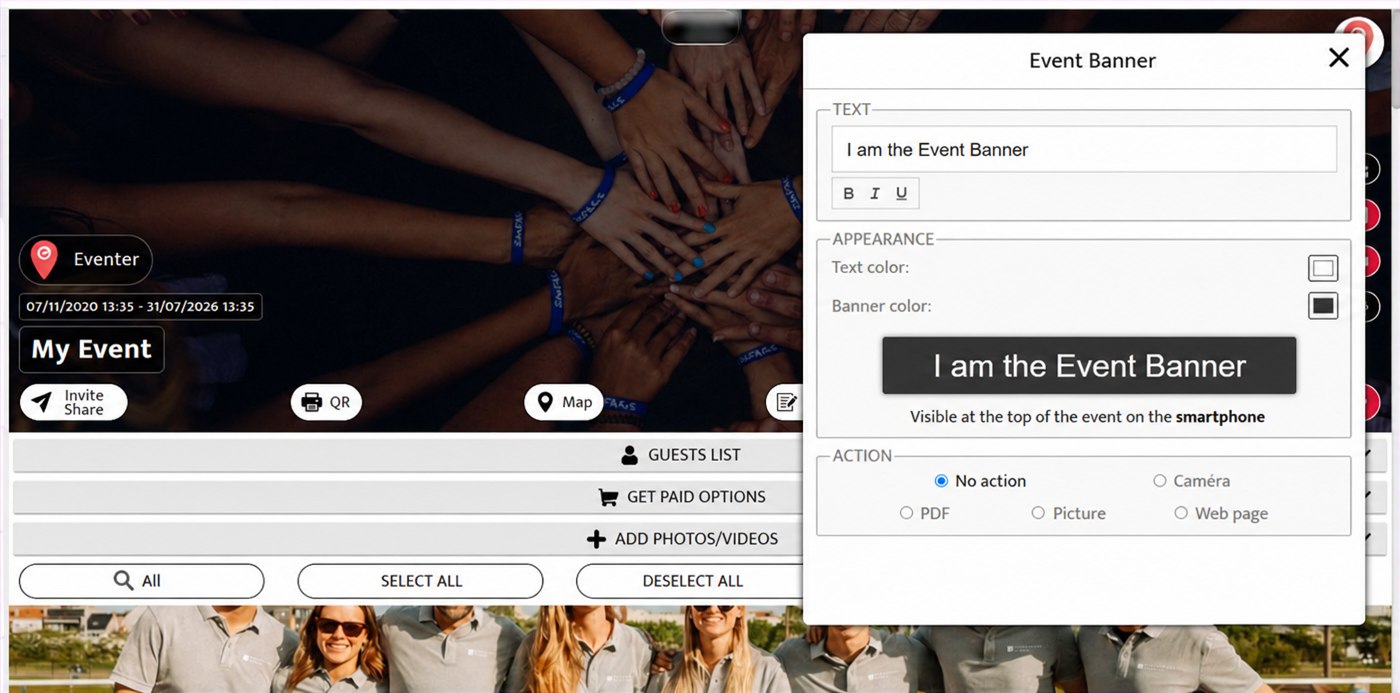
Set the text, the colours and the action triggered on click
As part of your Premium licence, you can choose the music of the After Movie.
The After Movie is an animation created after the event, built from the most liked photos and videos.
Your music will add a touch of emotion when your guests discover the After Movie.
When you purchased the Premium licence, an email was sent to you about this. Please reply to that email with the YouTube link of the music you have chosen. If you have an original composition, you can also send it to us in FLAC or WAV format.
Please note that the music must not exceed 3 minutes.
The Control Pack gives you finer control over your event: it adds a CONTROL SETTINGS section in the event settings, and lets you appoint several administrators.
These settings apply to guests only — an administrator is never limited by them.
Reaching the settings
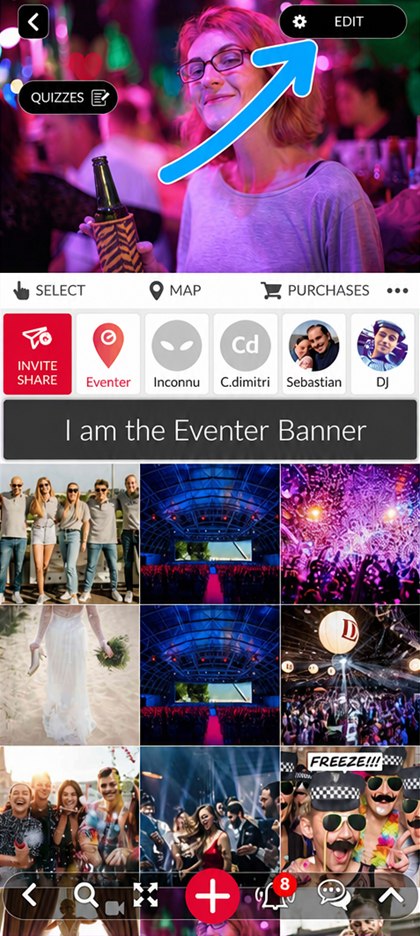
From the event, click “EDIT” at the top right
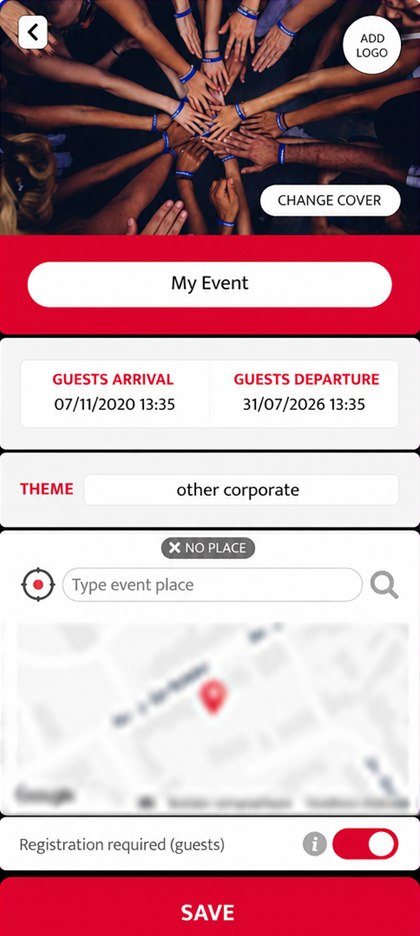
You land on the event settings
Then scroll down to the CONTROL SETTINGS section, below the paid options. It only appears once the Control Pack is enabled.
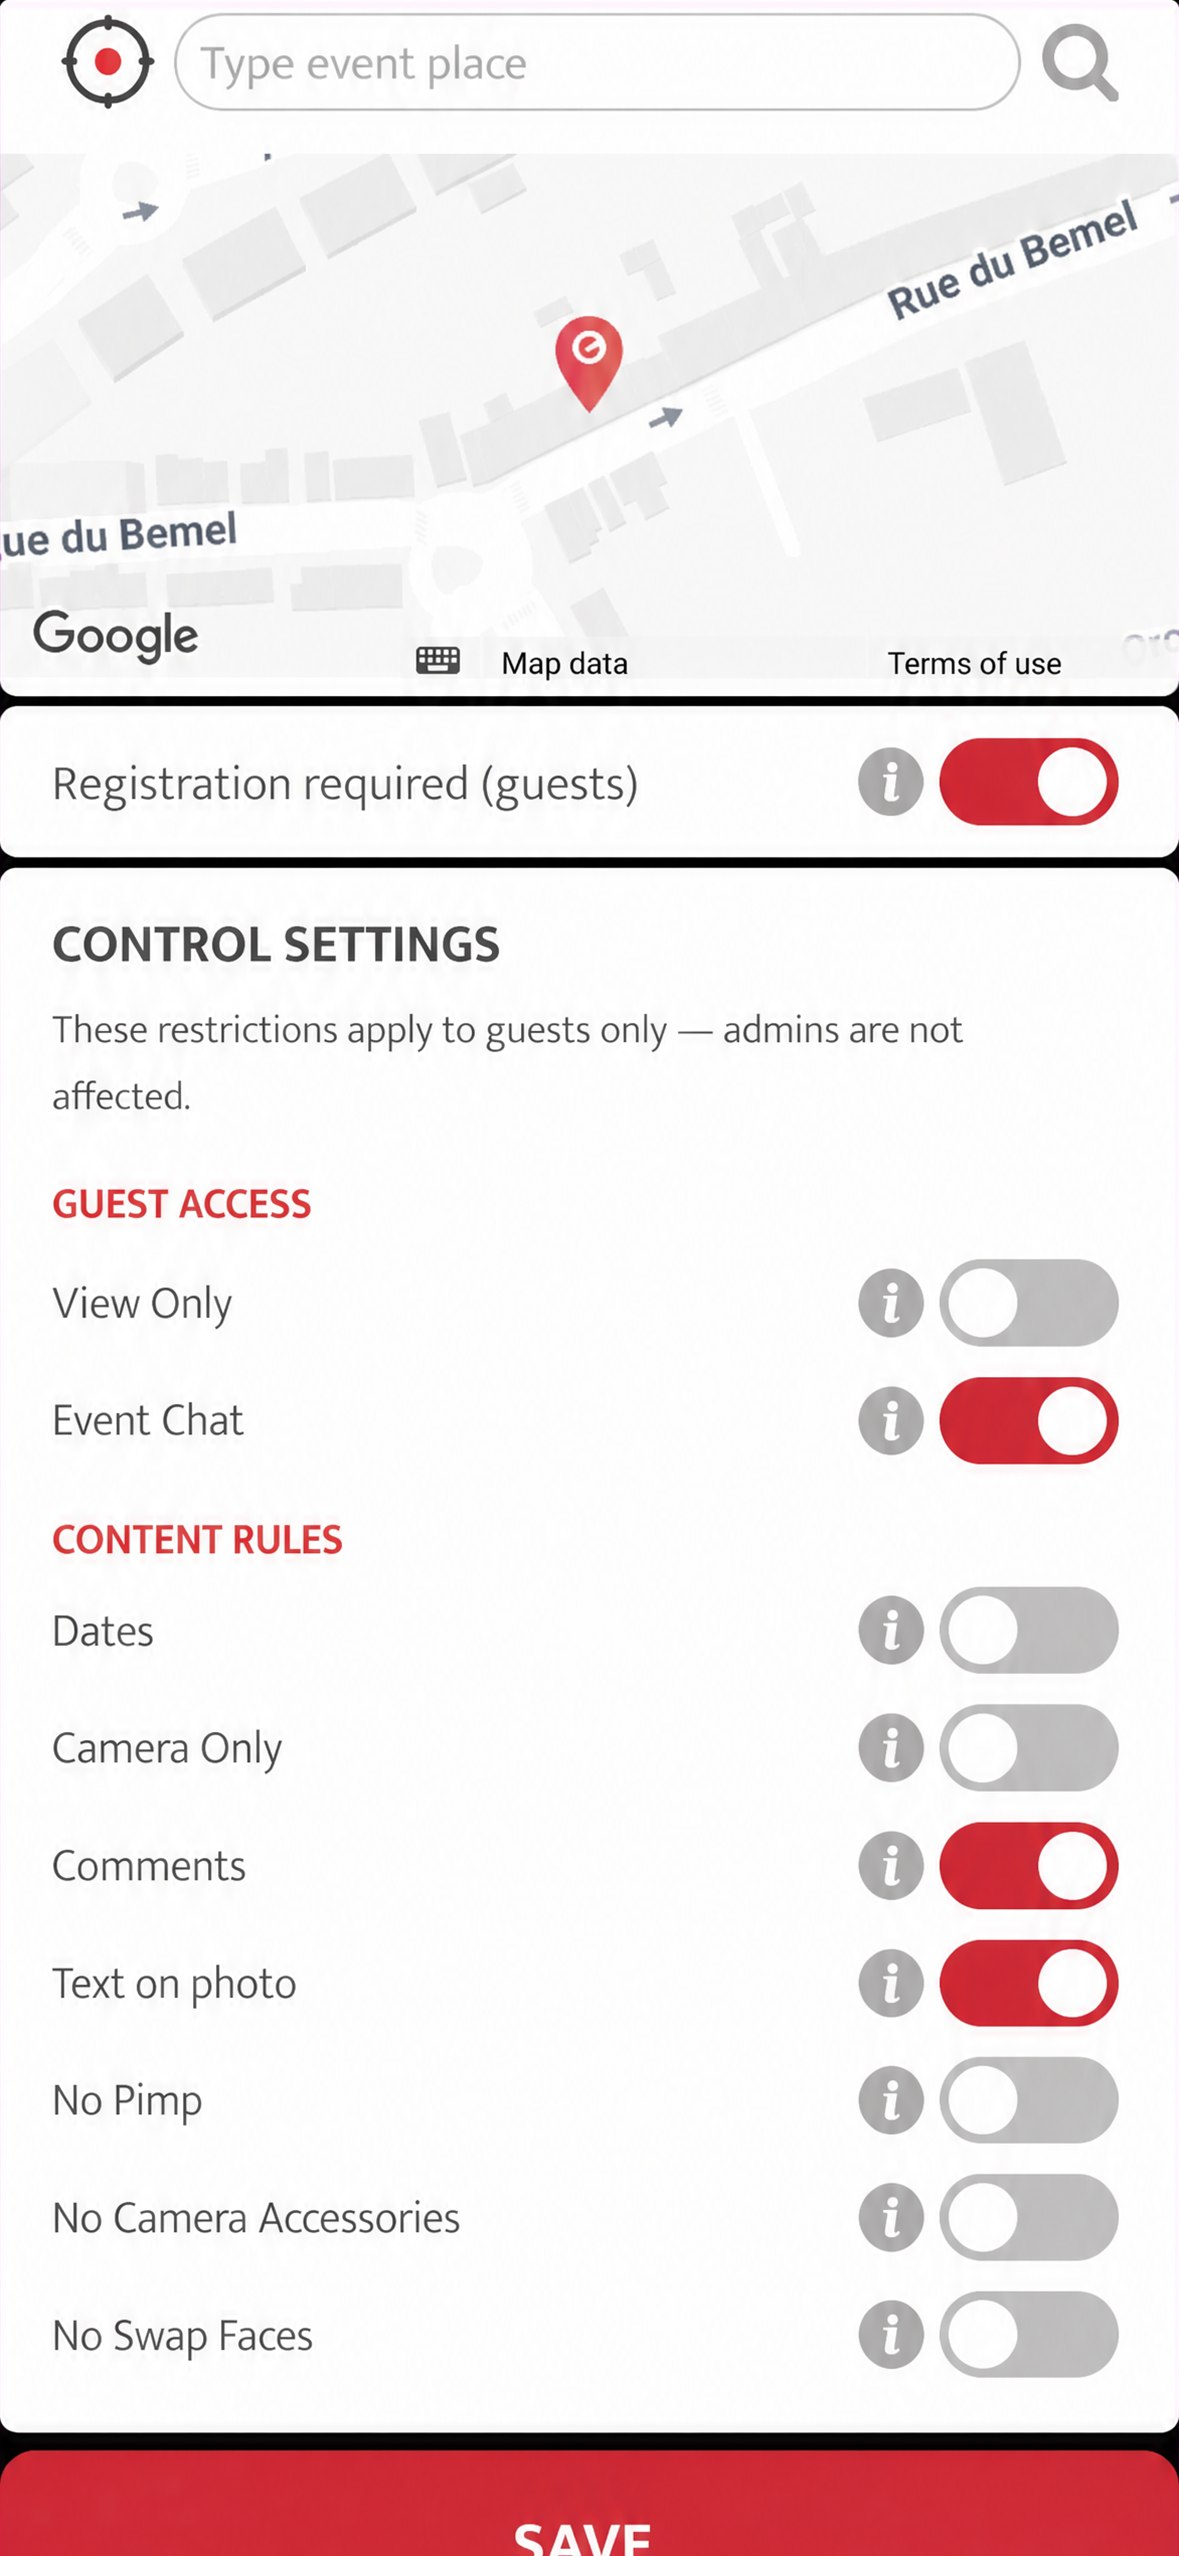
The CONTROL SETTINGS section, at the bottom of the event settings
GUEST ACCESS
- View Only — guests cannot add content. They can view the album and download it, but not contribute to it.
- Event Chat — lets guests write in the chat. Disabled, the chat is read-only for them; administrators can always write in it.
CONTENT RULES
- Dates — only content taken during the event is accepted. A guest can still add it after the end, as long as it was taken during.
- Camera Only — content can only come from the Eventer camera, never from the phone gallery.
- Comments — lets guests comment on photos and videos.
- Text on photo — lets guests write or draw on their content.
- No Pimp — the Pimp lets a guest bring a photo from the album back into the effects camera to retouch it. Enable it to remove the Pimp.
- No Camera Accessories — removes the AI-generated accessories: glasses, hats, beards, moustaches…
- No Swap Faces — removes the face swap, which puts guests’ faces into a fun scene.
Several administrators
The Control Pack also lets you appoint additional administrators, who escape every rule above. See the Administrators section.
If you want to connect a photographer to Eventer, visit our photographer tutorial.