On this page you will find a tutorial in order to help you use Eventer’s basic features.
If you need help on a more detailed topic, feel free to ask anything through the chat bot !
The username you’ll choose will be available for every single Eventer Album you’ll create.
You can also create an account with your Facebook or LinkedIn profile.
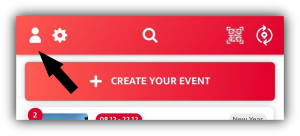
Click on the profil icon


Choose a way of registration


Fill up your informations and click on “sign up” to complete the registration


Click on “Email registration”


Click on “Log in”


Click on “Forgot password”


Reset your password


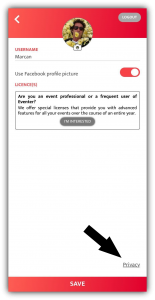
All your informations can be changed at any time (username, profile picture, …)
Click on the profile icon


Edit your profile and click “Save”


By geolocation:
Activate your geolocation and join an event


By QR code:
Scan the event QR code using the app scanner


By link:
Click on the link that the event organizer sent you

Click on “Create your event”


Fill all the basic info


Scroll down to choose more detailed options


Click on “Create event”


Click on “Invite guest”


Choose how you want to send the invitation


Click on a participant


Click on “Exclude”


Click on the camera icon


Add content directly from your smartphone or take a picture by clicking on the camera icon again


Click on the photo to share and click on the share icon


Choose the way you want to share the photo


Deleting one photo
Click on a photo


Click on “Settings”


Click on “Delete”


Deleting or saving multiple photos at once
Click on the “select” icon and select the content you want to deal with


You can share, download or delete the content you have selected with the three icons above


Click on Options


Click on “access it on your computer”


Follow the instructions


Choose a way to send it


Open the link on a computer


Select the content you want and save it in your computer


Click on Options
Click on “access it on your computer”
Follow the instructions
Choose a way to send it
Open the link on a computer and click on “Add Photos”


Scan the QR code that appears using the app scanner


Choose the content you want to upload or drag it in the upload window


You can modify the information of an event at any time. Here we show you how to modify the location.
Click on “Edit”


Type in the desired address and search for it


The Live Movie allows you to scroll through the contents of your private event only one by one on your screen for free. To do this:
- Turn on the computer and connect the battery to the power supply
- Connect the computer to the internet
- Check settings and prevent all standby options
- In your event, go below the page
- Below the video for the Live Movie, click on “Send it to your computer”

- Choose how you want to send the Live Movie link

- Open the link on your computer
- Connect the computer to the screen dedicated to the Live Movie via an adapted cable (usually HDMI or HDMI on VGA with retro projector adapter)
- For optimal display, make sure your screen is extended and your resolution is 100%
- Don’t forget to put the Live Movie in full screen!


You can at any time delete the content (photos/videos) that you have added, as well as the events you have created in Eventer. However, if you wish to delete all your data, please follow the procedure below:
– Go to Eventer
– Go to your Profile page
– At the bottom right of your profile page, click on Privacy.
All your data (photos, videos, events, comments, and email) will be permanently deleted from our servers within 24 hours.
Click on the profile button at the top left of the home screen
Click on “Privacy” at the bottom right of the profile page